Thigh Lift Surgery: Preparation, Procedure, and Scar Management

Preparing for Your Thigh Lift

Consultation

Schedule a consultation with a plastic surgeon. Discuss your goals and expectations for the thigh lift. Explain what you want to achieve in your waist, upper leg, and thigh area, including loose skin around the knees. The surgeon will examine your thighs, including the upper thigh area, knees, and waist. They will discuss the procedure, risks, and benefits.

Pre-Surgery Instructions

Follow the pre-surgery instructions given by your plastic surgeon during the consultation for your thigh lift to minimize scar work. These may include:

  • Adjusting medications to avoid complications
  • Stopping smoking to improve healing

These steps are crucial for a successful surgery.

Skin Examination

Prepare for the procedure by understanding the importance of a skin examination, especially for cosmetic surgery to avoid a scar on the entire thigh. The surgeon will assess your skin’s condition. This helps them plan how to remove excess skin and fat, contour your thighs properly, and minimize scar during cosmetic surgery.

Photography

Photography is essential for before-and-after comparisons. The plastic surgeon will take photos of your thighs, groin area, and waist before surgery to assess excess fat and potential scar locations. These images help track progress and results after the thigh lift and waist experience excess fat removal for the ideal candidate.

Understanding the Thigh Lift Procedure

Surgical Environment

Thigh lift surgery usually happens in a hospital or an ambulatory surgery center for an ideal candidate with excess fat around the waist. Hospitals offer comprehensive care with advanced medical facilities. Ambulatory centers provide a more focused and streamlined environment.

Both settings have sterile operating rooms to prevent infections. Surgeons, nurses, and anesthetists work together as a team. Patients often feel more comfortable in these controlled environments.

Anesthesia Process

Anesthesia is essential for thigh lift procedures. General anesthesia makes patients sleep deeply during surgery. Local anesthesia with sedation can also be used, keeping patients relaxed but awake, ideal candidates for a thigh lift in the upper thigh area to remove fat.

An anesthetist monitors vital signs throughout the procedure. This ensures patient safety and comfort.
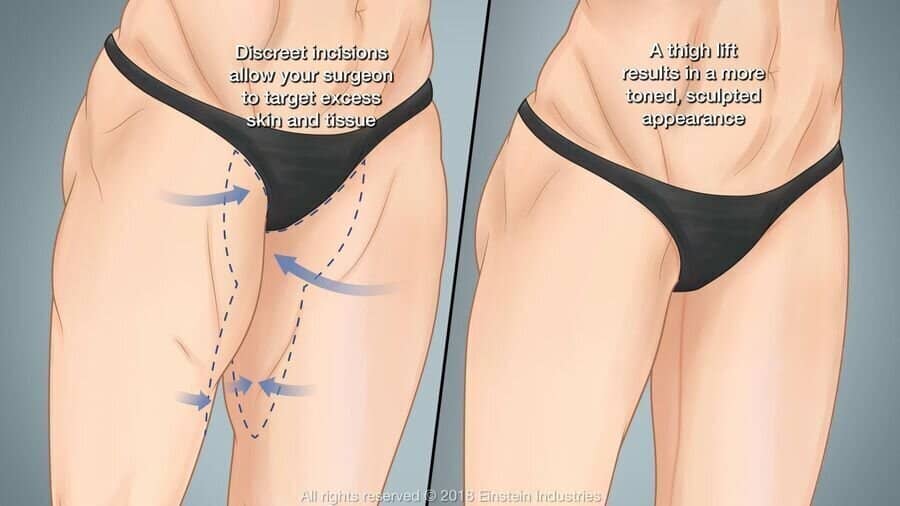
Incision Techniques

Surgeons make precise incisions to access thigh tissues. The incision location depends on the type of thigh lift, fat, and excess on the ideal candidate.

  • Inner thigh lifts involve incisions along the groin crease.
  • Outer thigh lifts require incisions from the groin around the hip to remove excess fat for the ideal candidate.
  • Vertical thigh lifts use longer incisions down the inner thighs to remove excess fat for the ideal candidate.

The surgeon decides based on patient needs and desired outcomes, considering the upper thigh, fat, thigh lift, and thigh area.

Tissue Repositioning

After making incisions, surgeons remove excess skin and fat. They carefully reposition remaining tissue for a smoother contour. This step requires skill to achieve natural-looking results.

Surgeons may use liposuction to remove stubborn fat deposits. This helps refine the shape of the thighs further.

Role of Stitches

Stitches play a crucial role post-surgery. They secure repositioned tissues and close incisions effectively. Surgeons use different types of stitches:

  • Absorbable stitches dissolve over time.
  • Non-absorbable stitches need removal after healing.

Proper stitching minimizes scarring and supports healing.

Types of Thigh Lifts Explained

Inner Thigh Lift

An inner thigh lift focuses on the upper part of the inner thighs and fat. Surgeons make incisions in the groin area. This type is ideal for those with excess skin and fat in the inner thigh region. It helps to improve leg contouring in the thigh area and offers a smoother appearance after a thigh lift by reducing fat.

Patients often choose this type after significant weight loss. The incision runs from the groin down to the knee or mid-thigh, depending on how much skin and fat need removal.

Outer Thigh Lift

The outer thigh lift targets the fat outer parts of the thighs. Incisions are made along the bikini line, extending around the hip and thigh area for a thigh lift to remove fat. This method is effective for removing excess skin and fat from the outer thighs.

This technique can also tighten and smoothen sagging skin. Patients looking to enhance their overall body shape often opt for this procedure, including a thigh lift to remove excess fat.

Vertical Thigh Lift

A vertical thigh lift involves incisions that run vertically along the inner thigh to remove fat. This type is suitable for individuals needing more extensive reshaping, such as a thigh lift or fat removal. It addresses both inner and outer thigh areas by removing larger amounts of fat tissue.

The scar runs from the groin down to the knee, providing significant improvements in leg contouring after a thigh lift. Patients should be aware that this thigh lift option results in more visible scarring.

Mini Thigh Lift

A mini thigh lift involves smaller incisions compared to other types. Surgeons make small cuts at the top of the leg near the groin area for a thigh lift. This method is best for those with minor sagging or excess skin issues, such as a thigh lift.

It provides subtle improvements with minimal scarring. Patients who do not need extensive reshaping often prefer this technique due to its less invasive nature, especially for a thigh lift.

Spiral Thigh Lift

The spiral thigh lift targets multiple areas, including inner, outer, front, and back thighs. Incisions are made around the buttock crease and extend towards the groin area for a thigh lift.

This comprehensive approach offers an all-around improvement in thigh contouring. It is suitable for patients seeking dramatic changes in their lower body appearance, such as a thigh lift.

Duration of Surgery and Recovery Insights

Surgery time

Thigh lift surgery typically takes around two hours.

Surgeons use this time to remove excess skin and fat from the thighs. They also tighten the remaining skin for a smoother appearance during a thigh lift. The procedure might vary slightly based on individual needs.

Initial recovery

After surgery, expect to rest for a few days.

Patients usually stay in the hospital overnight. This helps doctors monitor any immediate complications. Most people experience swelling and bruising. These symptoms are normal and should decrease over time.

Gradual return

Returning to normal activities happens gradually.

Light activities may resume after two weeks. However, avoid strenuous exercise or heavy lifting for at least six weeks. Following these guidelines ensures proper healing after a thigh lift and reduces risks of complications.

Follow-up appointments

Follow-up appointments are crucial post-surgery.

Doctors check the healing progress during these visits. They also address any concerns or complications that arise. Regular follow-ups help ensure successful recovery and optimal results after a thigh lift.

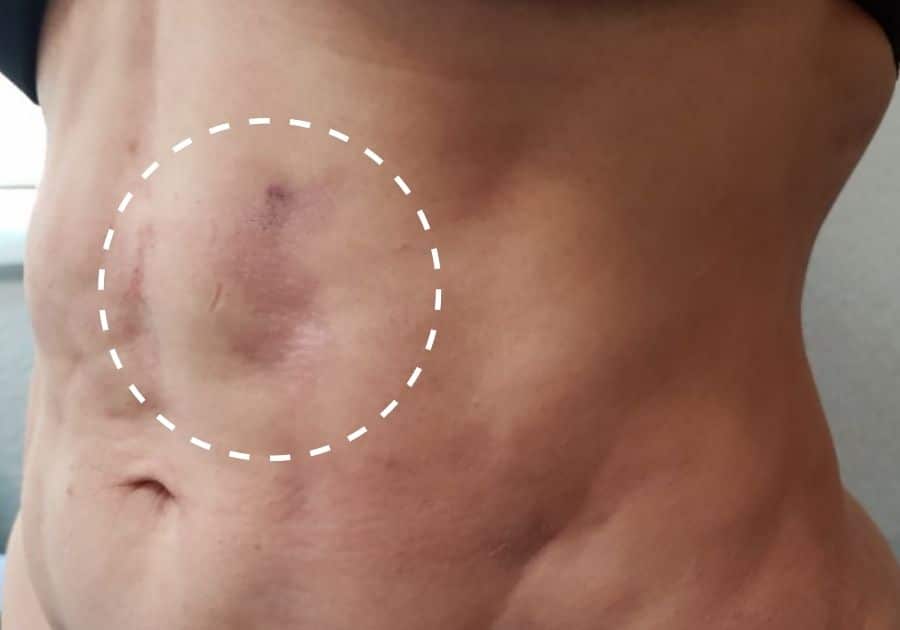
Managing Thigh Lift Scars

Scar Location

Scarring is inevitable in a thigh lift. The location of the scars varies. Inner thigh lifts usually leave scars from the groin to the knee. Outer thigh lifts may result in scars along the hip line.

Minimizing Appearance

Proper wound care is crucial for minimizing scars. Clean the incision area regularly. Use prescribed ointments to prevent infections. Keep the area dry and covered with sterile bandages.

Several treatments can help reduce scar visibility:

  • Silicone sheets or gels
  • Laser therapy
  • Steroid injections

Post-Surgery Care

After surgery, follow your surgeon’s instructions strictly. Avoid strenuous activities that stretch the skin. Wear compression garments as recommended. These steps help reduce swelling and support healing.

Long-Term Strategies

Long-term care is essential for better cosmetic outcomes. Apply sunscreen to protect scars from a thigh lift from UV rays, which can darken them.

Moisturize the scar area daily. This keeps the skin hydrated and more elastic, reducing scar tightness after a thigh lift.

Combining Thigh Lift with Other Procedures

Comprehensive Results

Combining a thigh lift with other procedures can offer comprehensive body contouring. This approach helps to address multiple areas at once. Many people opt for additional surgeries like a butt lift or lower body lift.

These combined surgeries can enhance the overall appearance. For instance, pairing a thigh lift with a butt lift creates smoother transitions between body parts. This combination can result in more balanced and harmonious results.

Simultaneous Surgeries

Discussing simultaneous surgeries with your surgeon is crucial. They will evaluate if you are a good candidate for multiple procedures, including a thigh lift. Your health and medical history play a significant role in this thigh lift decision.

Common combinations include:

  • Thigh lift and butt lift
  • Thigh lift and lower body lift
  • Thigh lift and liposuction

Each combination targets different areas, providing tailored solutions. The surgeon will explain the benefits and risks of each thigh lift option.

Recovery Time

Combined procedures impact recovery time. Undergoing multiple surgeries means longer healing periods. However, it also means fewer overall recovery phases compared to separate thigh lift surgeries.

Your surgeon will provide detailed guidance on what to expect during thigh lift recovery. You might need more rest and assistance during the initial weeks post-thigh lift surgery.

By combining procedures like a thigh lift, you streamline your recovery process into one period instead of multiple ones over several months.

Surgical Planning

Planning is essential for successful outcomes. Your surgeon will create a personalized surgical plan for a thigh lift based on your goals and anatomy. This plan includes the order of procedures, specific techniques used, and thigh lift.

For example, they might perform liposuction first to remove excess fat before lifting the thighs and buttocks. This sequence ensures optimal results for each area treated.

Aftercare and Recovery Process

Post-Surgery Care

Follow detailed post-surgery care instructions to support healing. Surgeons provide specific guidelines on how to care for the surgical site after a thigh lift. This may include changing dressings, keeping the area clean after a thigh lift, and using prescribed medications. Proper care reduces the risk of complications like infection.

Patients should avoid bathing in pools or hot tubs until cleared by their thigh lift surgeon. Showering is usually allowed after a few days. It’s crucial to follow all recommendations closely for optimal recovery after a thigh lift.

Rest and Activity

Prioritize rest after surgery. Strenuous activities can hinder the healing process and lead to complications after a thigh lift. Patients are often advised to take time off work, typically one to two weeks, depending on their job’s physical demands, especially after a thigh lift.

Light walking is encouraged soon after thigh lift surgery to improve circulation. However, avoid heavy lifting or intense exercise for at least six weeks. Following these guidelines helps ensure a smooth recovery.

Common Experiences

Be prepared for common post-surgery experiences like soreness and swelling after a thigh lift. These are normal and usually subside within a few weeks after a thigh lift. Pain medication prescribed by your surgeon after a thigh lift can help manage discomfort.

Swelling may last longer but gradually decreases over time. Wearing compression garments as recommended can aid in reducing swelling and supporting the new contour of your thighs.

Follow-Up Appointments

Attending follow-up appointments is essential for monitoring progress. Surgeons check the healing process and address any concerns during these thigh lift visits. They also remove stitches if necessary after a thigh lift and make adjustments to the recovery plan based on individual needs.

Regular follow-ups ensure that any issues are detected early, allowing for timely intervention if needed.

Patient Community Support

Joining a patient community can be beneficial during recovery. Connecting with others who have undergone similar procedures, such as a thigh lift, provides emotional support and practical advice. Sharing experiences helps patients feel less isolated during their recovery journey.

Online forums and local support groups offer platforms for discussing concerns, sharing tips, and celebrating milestones together.

Dramatic Improvement

Patients often notice dramatic improvement in their thigh appearance once fully healed. The results of a thigh lift can be life-changing, boosting confidence and comfort in clothing choices.

Potential Risks and When to Seek Help

Risks and Side Effects

Thigh lift surgery comes with potential risks. Common side effects include swelling, bruising, and pain. These usually subside within a few weeks. However, some patients may experience more severe complications.

Infections are a significant risk. Signs of infection after a thigh lift include redness, warmth, or pus at the incision site. Fever is another indicator.

Blood clots can also occur post-surgery. Watch for leg pain or swelling that doesn’t improve. Breathing difficulties might suggest a clot has traveled to the lungs.

Ideal Candidate Considerations

Not everyone is an ideal candidate for a thigh lift. People with certain health conditions face higher risks. Smokers and individuals with poor circulation have increased chances of complications.

Patients should have realistic expectations about the results and recovery process of a thigh lift. Discuss all medical history during the initial consultation to assess suitability for a thigh lift.

Recognizing Complications

After surgery, monitor your body closely. Persistent pain or excessive bleeding needs immediate attention. If you notice any unusual symptoms, contact your doctor right away.

Numbness around the incision area after a thigh lift can be normal initially but should gradually improve. If it persists or worsens, seek medical advice.

Importance of Communication

Maintaining open communication with your surgical team is crucial. Share any concerns or changes in your condition promptly. Regular follow-up appointments help track progress and address issues early on.

Your surgeon will provide specific instructions for care after a thigh lift surgery. Follow these guidelines carefully to minimize risks and ensure proper healing after a thigh lift.

Seeking Immediate Help

Certain situations require urgent medical intervention:

  • Severe pain unrelieved by medication
  • Sudden shortness of breath
  • Chest pain
  • Signs of infection like high fever or spreading redness

Do not hesitate to seek help if you experience any of these symptoms after a thigh lift.

Summary

You’ve learned a lot about thigh lifts. From prep to aftercare, you now know what to expect and how to manage your thigh lift recovery. Understanding the types and risks of a thigh lift helps you make informed decisions.

Ready to take the next step? Consult a qualified surgeon to discuss your options. Your journey to smoother, firmer thighs starts now. Don’t wait—embrace the change today!

Frequently Asked Questions

What should I do to prepare for a thigh lift?

Consult your surgeon. Follow pre-surgery instructions for a thigh lift, which may include stopping certain medications and avoiding smoking. Arrange for post-op care.

What happens during a thigh lift procedure?

The surgeon removes excess skin and fat from the thighs. They then reshape and tighten the remaining tissue for a smoother contour.

How long does it take to recover from a thigh lift?

Initial recovery usually takes 2-3 weeks. Full recovery can take several months. Follow your surgeon’s aftercare instructions closely.

Will I have scars after a thigh lift?

Yes, scars are inevitable but will fade over time. Proper aftercare can help minimize their appearance.

Can I combine a thigh lift with other procedures?

Yes, many patients combine it with liposuction or tummy tuck for comprehensive body contouring. Consult your surgeon for personalized advice.

What are the potential risks of a thigh lift?

Risks include infection, scarring, and asymmetry. Always follow your surgeon’s guidelines and report any unusual symptoms immediately.

When should I seek help after my thigh lift surgery?

Seek immediate medical attention if you experience severe pain, signs of infection, or unusual swelling. Always err on the side of caution.

Exploring J-Plasma Liposuction: Side Effects, Advantages, and Considerations

Understanding J-Plasma Technology

Definition and Use

J-Plasma is a new technology used in plastic surgery and skin resurfacing procedures. It combines cold helium plasma with radiofrequency energy. This combination allows for precise skin tightening and fat removal through small incisions, often used by plastic surgeons in plastic surgery and dermal resurfacing. Surgeons use J-Plasma in plastic surgeries and aesthetic procedures to improve body contours and reduce sagging skin with minimal scarring.

Precision and Control

J-Plasma offers more precision than traditional liposuction methods. The cold plasma stream targets specific areas without affecting surrounding tissues, promoting skin contraction and resurfacing while minimizing heat and scarring. This level of control reduces the risk of uneven results and scarring in procedures involving a combination of heat. Patients often experience smoother skin and more natural-looking outcomes with fewer complications and less scarring.

Technological Advancements

Technological advancements allow J-Plasma to minimize tissue damage. The cold helium plasma cools the treatment area instantly, reducing heat exposure and complications for the patient, minimizing scarring. This cooling effect protects the skin from burns and other complications. As a result, recovery times are shorter compared to older methods.

Exploring Side Effects

Swelling and Bruising

Swelling and bruising are common after J-Plasma liposuction. Patients usually experience these effects within the first few days post-surgery. The swelling often peaks around day three or four. It gradually decreases over the next two weeks.

Bruising can vary in intensity. Some patients may see light bruises, while others might have more noticeable marks. Most bruising fades within two weeks. However, some cases might take longer to heal fully.

Scarring Factors

Scarring is a potential risk with any surgical procedure. With J-Plasma treatments, several factors influence scar formation. Patient’s skin type plays a significant role. People with darker skin tones may be more prone to noticeable scars.

The location of the treatment area also matters. Areas with thinner skin, like the neck, tend to scar more easily than areas with thicker skin, such as the abdomen. Surgeon’s technique is crucial too. Experienced surgeons know how to minimize scarring by making precise incisions and handling tissues gently.

Nerve Damage Risks

Nerve damage is a rare complication but can occur with J-Plasma liposuction. This risk increases if the surgeon lacks experience or uses improper techniques during surgery. Nerve damage can cause numbness, tingling, or even loss of sensation in the treated area.

Patients should watch for signs of nerve damage post-surgery. If experiencing persistent numbness or unusual sensations beyond typical recovery time, consult your doctor immediately.

Skin Discoloration

Skin discoloration is another rare but serious effect of J-Plasma treatments. This condition happens when the treated skin heals unevenly, leading to patches of different colors on the body.

Several factors contribute to this risk:

  • Patient’s medical history
  • Quality of aftercare
  • Skill level of the surgeon

Choosing an experienced practitioner reduces this risk significantly.

Managing Common Concerns

Discomfort and Pain

Discomfort after J-Plasma liposuction is common. Over-the-counter medications like ibuprofen or acetaminophen can help. Avoid aspirin as it may increase bruising. Follow the dosage instructions on the packaging.

Applying ice packs to the treatment area can reduce pain. Wrap the ice pack in a cloth to avoid direct contact with skin. Use the ice pack for 20 minutes at a time, several times a day.

Swelling and Bruising

Swelling and bruising are normal after this procedure. Rest is crucial for recovery. Elevate the treated area when possible to reduce swelling.

Ice packs also help minimize swelling and bruising. Apply them as described earlier for best results.

Infection Prevention

Preventing infection is vital for healthy healing. Keep the treated area clean and dry. Follow your health care provider‘s instructions on wound care.

Change dressings as advised by your doctor. Avoid touching the area with dirty hands to prevent bacteria from entering the wound.

Promoting Healthy Healing

Healthy healing requires proper care of the soft tissue in the treated area. Wear any recommended compression garments as directed by your doctor. These garments support healing and reduce swelling.

Stay hydrated and eat a balanced diet rich in vitamins and minerals. Good nutrition supports tissue repair and overall recovery.

Resuming Normal Activities

Return to normal activities gradually. Light walking can promote blood circulation without straining the body.

Avoid strenuous activities or heavy lifting until cleared by your health care provider. This helps prevent complications and supports proper healing.

Monitoring Appearance Changes

Monitor changes in appearance closely during recovery. Some loose skin may remain, especially in older women or those with significant weight loss history.

Discuss any concerns with your doctor during follow-up appointments. They can provide guidance on additional treatments if needed, such as tummy tucks for excess skin removal.

Benefits of J-Plasma

Reduced Scarring

J-Plasma liposuction uses plasma energy to target fat cells. This technique minimizes damage to surrounding tissues. Traditional liposuction often results in noticeable scars. J-Plasma, however, reduces the risk of scarring significantly. The precise application of plasma energy ensures only the targeted areas are affected.

Patients experience smoother skin post-surgery. This is a major benefit for those concerned about visible scars.

Precise Contouring

J-Plasma offers more accurate body contouring. Surgeons can achieve detailed and precise results with this method. The controlled use of plasma allows for better sculpting of the body.

Traditional methods sometimes leave uneven surfaces. However, J-Plasma provides a more uniform appearance. Patients report higher satisfaction with their results due to this precision.

Skin Tightening

One unique benefit of J-Plasma is skin tightening. Standard liposuction removes fat but often leaves loose skin behind. Plasma energy stimulates collagen production, which tightens the skin naturally.

This added benefit means patients enjoy firmer skin after surgery. It also reduces the need for additional procedures to remove excess skin.

Enhanced Recovery

Recovery time is another advantage of J-Plasma liposuction. Patients typically heal faster compared to traditional methods. Less tissue damage means less bruising and swelling.

People can return to their normal activities sooner. This quicker recovery is appealing for those with busy lifestyles.

Long-Lasting Results

The results from J-Plasma are long-lasting. Collagen production continues even after the procedure, enhancing dermal resurfacing over time.

Patients see improvements in their body’s appearance for months post-surgery. Maintaining a healthy lifestyle can further extend these benefits.

Assessing Suitability for J-Plasma

Ideal Candidate

The ideal candidate for J-Plasma liposuction is generally in good health. They should have realistic cosmetic goals and a stable body weight. Individuals seeking tighter skin and fat reduction may benefit most from this procedure.

Candidates should be non-smokers, as smoking can affect healing. They should also not have any serious medical conditions that could impair recovery.

Consultation Importance

A thorough consultation with a qualified practitioner is crucial. The plastic surgeon will evaluate the patient’s health status and cosmetic goals. This helps to determine if J-Plasma liposuction is suitable.

During the consultation, the surgeon will discuss potential risks and benefits. It’s important to choose a board certified plastic surgeon for this evaluation. Certification ensures that the practitioner has met specific standards of education and expertise.

Health History Considerations

Individuals with a history of skin pigmentation disorders need careful assessment. These conditions might increase the risk of complications like hyperpigmentation or scarring.

Patients with nerve sensitivity issues should also consult their doctor thoroughly. Nerve sensitivity can lead to increased pain or discomfort during and after the procedure.

Additional Factors

Certain factors can influence suitability for J-Plasma liposuction:

  • Age: Older individuals might have different skin elasticity.
  • Blood vessels: Those with fragile blood vessels may face higher risks.
  • Tissue quality: Poor tissue quality can affect results and recovery.

Summary

J-Plasma liposuction offers innovative technology that minimizes side effects while providing impressive benefits. Understanding the potential risks and how to manage them is key to making an informed decision. This procedure could be a game-changer for those looking for effective body contouring.

If you’re considering J-Plasma, assess your suitability with a qualified professional. Take the next step towards achieving your aesthetic goals by consulting an expert today. Your journey to a more confident you starts now.

Frequently Asked Questions

What is J-Plasma technology?

J-Plasma combines helium gas and radiofrequency energy to create a cool plasma stream. It tightens skin and removes fat with minimal damage.

Are there any side effects of J-Plasma liposuction?

Yes, possible side effects include swelling, bruising, and temporary numbness. These are usually mild and resolve quickly.

How can I manage common concerns post-procedure?

Follow your surgeon’s aftercare instructions. Use compression garments and avoid strenuous activities for the recommended period.

What are the benefits of J-Plasma liposuction?

Benefits include tighter skin, precise fat removal, and quicker recovery compared to traditional liposuction methods.

Who is a good candidate for J-Plasma liposuction?

Ideal candidates are healthy individuals with moderate skin laxity and localized fat deposits that are resistant to diet and exercise.

How long does it take to see results from J-Plasma liposuction?

Initial results are visible immediately. Full results develop over 3-6 months as swelling subsides and collagen production increases.

Is J-Plasma liposuction safe?

Yes, when performed by a certified professional. Always consult with a qualified surgeon to assess risks and ensure safety.

Botox for Men: Benefits, Safety, and Costs Explained

Understanding Botox for Men

What is Botox?

Botox is a treatment derived from botulinum toxin. It temporarily paralyzes muscles. This helps to reduce wrinkles and fine lines. For men, Botox works on thicker skin and stronger facial muscles.

How Botox Works for Men

Men typically have thicker skin than women. Their facial muscles are also stronger. This means that Botox injections must be carefully placed. The treatment smooths out forehead lines by relaxing the muscles.

Growing Trend

More men are seeking Botox treatments today. They want to maintain a competitive edge in the workplace. A youthful appearance can boost confidence in social settings too.

Workplace Competitiveness

In many industries, looking younger can be an asset. Male patients often seek Botox to reduce signs of aging. This can help them feel more confident at work.

Social Settings

Botox also helps men feel better about their appearance in social situations. Smoother skin can lead to increased self-esteem and social success.

Importance of Professional Consultation

Consulting with an experienced professional is crucial. Male facial anatomy differs from female anatomy. Professionals who understand these differences provide better results.

Expertise Matters

Choosing a skilled practitioner ensures safety and effectiveness. They know where to inject for optimal outcomes without overdoing it.

Why Botox Appeals to Men

Grooming Routine

Botox has become a part of the modern man’s grooming routine. Men now include it alongside traditional practices like shaving and skincare. Many men seek a polished look that Botox can help achieve. It smooths out wrinkles on the forehead, giving a youthful appearance.

Shaving and skincare are daily habits for most men. Adding Botox to this routine is simple and effective. The procedure is quick, usually taking about 15 minutes. Recovery time is minimal, making it easy to fit into a busy schedule.

Social Media Influence

ial media plays a significant role in increasing men’s awareness of cosmetic procedures like Botox. Platforms like Instagram and TikTok showcase before-and-after photos. These images highlight the benefits of Botox, making it more appealing.

Many men follow influencers who share their experiences with Botox. This visibility normalizes the procedure for men of all ages. Online discussions and reviews also provide valuable information, helping men make informed decisions.

Psychological Benefits

Botox offers psychological benefits that go beyond physical appearance. Feeling good about one’s looks can boost confidence. For many men, reducing forehead wrinkles leads to improved self-esteem.

Improved mental health is another benefit of looking good. Men who feel confident are often happier and more socially active. They may perform better at work and enjoy richer personal lives.

Common Injection Sites

Forehead

Men often get Botox injections in the forehead. This area is prone to deep lines and wrinkles due to frequent muscle movement. Targeting the forehead helps smooth these lines, giving a more youthful appearance.

The treatment focuses on the frontalis muscle. This muscle lifts the eyebrows and causes horizontal lines on the forehead. By relaxing this muscle, Botox reduces these lines without making the face look frozen.

Crow’s Feet

Crow’s feet are another common site for Botox. These fine lines appear at the corners of the eyes when smiling or squinting. Men choose to treat crow’s feet to maintain a refreshed look.

Botox works by targeting the orbicularis oculi muscles around the eyes. Relaxing these muscles softens crow’s feet, making them less noticeable while still allowing natural expressions.

Between Eyebrows

The area between the eyebrows is also popular for Botox treatments. Known as glabellar lines or “11s,” these vertical lines form from frowning or concentrating.

Botox targets the corrugator and procerus muscles in this region. Relaxing these muscles smooths out glabellar lines, reducing a stern or tired appearance.

Strategic Importance

Targeting specific areas with Botox can enhance a man’s appearance without compromising masculine features. The goal is to achieve a natural, rejuvenated look.

By focusing on key facial muscles, Botox can:

  • Smooth deep-set wrinkles
  • Maintain natural facial expressions
  • Enhance overall symmetry

This approach avoids an overdone look, which is crucial for men seeking subtle improvements.

Hyperhidrosis Treatment

Botox isn’t just for cosmetic purposes; it also treats hyperhidrosis or excessive sweating. Men who suffer from this condition can benefit greatly from Botox injections.

The treatment blocks nerve signals that activate sweat glands. Common areas treated include:

  • Underarms
  • Palms
  • Soles of feet

This use of Botox showcases its versatility beyond wrinkle reduction.

Key Benefits of Forehead Treatment

Reduces Deep Wrinkles

Botox effectively reduces deep forehead wrinkles. Men often develop these lines due to facial expressions and aging. Botox relaxes the muscles that cause these wrinkles. This results in a smoother forehead.

Quick and Minimally Invasive

Botox is a non-surgical procedure. It involves a few small injections into the forehead. The entire process takes about 10-15 minutes. There is no downtime, making it ideal for busy professionals.

Immediate Results

Men can see results within a few days after treatment. The full effect becomes visible in about one week. These quick results make Botox appealing for those seeking fast improvements.

Prevents Future Wrinkles

Using Botox on the forehead can delay the onset of new wrinkles. By relaxing the muscles, it prevents them from forming deep lines over time. This helps maintain a youthful appearance longer.

Long-lasting Effects

The effects of Botox last around 3-4 months. Regular treatments can prolong these benefits. Many men find this duration convenient as it fits well into their schedules.

Boosts Confidence

Improving one’s appearance can boost self-confidence. Men who receive Botox treatments often feel more confident at work and in social situations. A smoother forehead can enhance their overall look.

Preventative Botox Tips

Early Treatments

Starting Botox treatments early can be beneficial. Beginning before deep wrinkles form leads to better long-term results. Botulinum toxin injections relax facial muscles, preventing the formation of new wrinkles. Men often have stronger facial muscles than women, causing deeper lines over time. Treating these muscles early helps keep skin smoother.

Regular Maintenance

Regular maintenance sessions are crucial for effective results. Each person’s needs vary based on their facial muscle dynamics. Men usually need more units of Botox due to their thicker skin and stronger muscles. Maintenance sessions every 3-4 months help maintain a natural look. Consistency ensures that the effects do not wear off completely.

Realistic Expectations

Having realistic expectations is essential. Botox will soften lines but won’t erase them completely. Open communication with the provider ensures desired outcomes. Discussing goals and concerns helps tailor the treatment plan. This approach leads to subtle, natural-looking results.

Professional Providers

Choosing a professional provider is vital for safety and effectiveness. A qualified specialist understands male facial anatomy better. They can customize the treatment to suit individual needs. Visiting a reputable medical spa or clinic guarantees high standards of care and hygiene.

Safety and Effectiveness

Efficacy Studies

Botox has shown high efficacy in male patients. A study from the American Society for Dermatologic Surgery in 2019 found that 93% of men reported satisfaction with their Botox treatment. The treatment effectively reduces forehead lines, giving a smoother look. Clinical trials also support these findings, demonstrating significant wrinkle reduction in men.

Qualified Injector

Choosing a qualified injector is crucial. An experienced professional knows the right dosage and injection points. This minimizes risks like droopy eyelids or uneven results. Board-certified dermatologists or plastic surgeons are ideal choices. They have specialized training to ensure safety and effectiveness.

Common Misconceptions

Many think Botox can stop aging entirely. This is not true. Botox reduces wrinkles but doesn’t halt the aging process. It works by relaxing muscles that cause lines, not by filling them in. Another myth is that Botox treatments are permanent; they last about three to four months before needing a touch-up.

Emotional Impact

Botox can boost self-esteem significantly. Men often feel more confident at work and social events after treatment. For example, John, a 45-year-old manager, reported feeling more assertive during meetings post-Botox.

Realistic Expectations

Setting realistic expectations is essential for satisfaction. Botox improves the appearance of fine lines but won’t make you look 20 years younger. It’s best suited for mild to moderate wrinkles on the forehead.

Long-term Use

Long-term use of Botox is generally safe when administered by professionals. Studies show no major adverse effects even after years of regular treatments. However, some people may develop resistance over time, requiring higher doses for the same effect.

Cost Considerations

Average Cost

Men may need more Botox units than women. This is due to stronger facial muscles. On average, men require 20-30 units for the forehead area alone. The cost per unit ranges from $10 to $15. Thus, a single treatment can cost between $200 and $450.

Prices vary based on location and clinic reputation. Urban areas often have higher prices. Clinics with experienced professionals may charge more. Always consider the expertise of the provider.

Long-term Investment

Botox can be a long-term investment in appearance. Regular treatments help maintain results over time. Initially, treatments are needed every three to four months.

With consistent use, some men find they need fewer units over time. This can reduce overall costs in the long run. Maintenance treatments might extend to five or six months apart.

Investing in regular Botox can prevent deeper wrinkles from forming. This proactive approach can save money on more invasive procedures later.

Budgeting Tips

Budgeting for Botox involves careful planning. Here are some tips:

  • Look for reputable clinics offering package deals.
  • Some clinics provide loyalty discounts for regular clients.
  • Compare prices at different clinics but prioritize quality over cost.
  • Allocate funds specifically for cosmetic treatments in your budget.

Potential Side Effects

Common Side Effects

Botox injections can cause some common side effects. These usually include temporary bruising or swelling at the injection site. Most people experience mild discomfort.

e may notice redness and slight bleeding. These symptoms typically resolve within a few days. Serious side effects are rare but possible.

Post-Treatment Care

Proper care after Botox treatment helps minimize side effects. Avoid touching or rubbing the treated area for at least 24 hours. This prevents the toxin from spreading to other areas.

Refrain from strenuous activities for a day post-treatment. Applying ice packs can reduce swelling and bruising. Follow all aftercare instructions provided by your healthcare provider.

Serious Side Effects

Though uncommon, serious side effects can occur. These might include muscle weakness, difficulty swallowing, or breathing issues. If any of these happen, seek medical attention immediately.

Allergic reactions are also rare but possible. Symptoms could include itching, rash, or dizziness.

Importance of Disclosure

Disclosing all health information to your provider is crucial. This includes any medical conditions you have or medications you’re taking.

Certain conditions may increase the risk of adverse reactions. Inform your doctor about any history of allergies or neurological disorders.

Final Thoughts

Benefits

Botox offers several benefits for men. It helps reduce fine lines and wrinkles on the forehead. This results in a more youthful appearance. Many men find this boosts their confidence.

The procedure is quick and often takes just a few minutes. There is little to no downtime needed after treatment. Men can return to their normal activities right away.

Considerations

There are important considerations before getting Botox. Researching the process is crucial. Understanding the facts helps make an informed decision.

Consultation with a doctor is necessary. An experienced professional tailors the treatment to individual needs. This ensures safety and effectiveness.

Modern Grooming

Botox has become part of modern male grooming. More men are using it to maintain their appearance as they age. It is now seen as a routine self-care practice.

This trend shows that taking care of one’s appearance is not just for women anymore. Men are embracing cosmetic procedures without stigma.

Normalization

The normalization of Botox for men reflects broader trends in wellness and self-improvement. Society increasingly values looking and feeling good at any age.

Men should feel empowered to explore these options without judgment. Cosmetic treatments like Botox help achieve personal goals.

Summary

Botox for men, especially for the forehead, is more popular than ever. It’s safe, effective, and offers a youthful look. By understanding its benefits and knowing what to expect, you can make an informed decision.

Ready to give it a shot? Consult with a qualified professional to explore how Botox can enhance your appearance. Stay ahead of the game and invest in your confidence today!

Frequently Asked Questions

What is Botox for men?

Botox for men is a cosmetic treatment that reduces wrinkles and fine lines. It’s especially popular for the forehead area.

Why do men choose Botox?

Men opt for Botox to look younger and more refreshed. It boosts confidence and can improve professional appearance.

Where are common injection sites?

Common sites include the forehead, crow’s feet, and between the eyebrows. These areas show aging signs first.

Are there benefits to treating the forehead specifically?

Yes, treating the forehead smooths out deep lines, providing a more youthful look. It also prevents new wrinkles from forming.

Is Botox safe and effective?

Botox is FDA-approved and generally safe when administered by certified professionals. Results are effective and long-lasting.

How much does Botox cost?

Costs vary but typically range from $200 to $600 per session. Prices depend on the number of units needed.

What are potential side effects?

Side effects may include minor bruising, swelling, or redness at the injection site. Serious complications are rare when done by experts.

Cellulite Removal: Proven Treatments & New Options

Unveiling Cellulite Treatments

Common Issue

Cellulite affects most women. It does not matter their fitness level. Even athletes can have it. The condition results from fat cells pushing against the skin, leading to cellulite development and cellulite depressions in the fatty layer.

Treatment Options

There are various cellulite treatments available today. Some focus on reducing fat cells. Others aim to tighten the skin. Each method has different effectiveness and duration.

Skin Tightening

Skin tightening treatments use heat or energy to firm the dermis. Radiofrequency and laser treatments are common methods. These procedures help reduce cellulite severity by improving skin laxity, cutaneous microcirculation, and subcutaneous tissue through several treatments targeting subcutaneous fat.

Dermal Fillers

Dermal fillers can fill in cellulite depressions. They make the skin surface smoother. Fillers like collagenase break down tough bands under the skin, improving the appearance of severe cellulite and cellulite depressions in subcutaneous tissue. Multiple sessions may be needed for best results.

Subcutaneous Fat Reduction

Reducing subcutaneous fat can also lessen cellulite development. Techniques like cryolipolysis freeze fat cells in subcutaneous tissue, causing them to die off naturally over time and aiding in skin tightening.

Collagen Boosting

Collagen is a protein in the dermis that helps keep skin firm and elastic, potentially reducing severe cellulite development. Some treatments aim to boost collagen production and increase collagenase activity in the dermis layer of the skin to reduce cellulite in the patient. Microneedling and certain creams can stimulate collagen growth.

Cosmetic Procedures

Cosmetic procedures like liposuction remove excess fat but may not always improve cellulite, skin laxity, or skin appearance significantly. They often require a combination with other treatments and devices to help the patient for better results.

Proven Methods for Removal

Acoustic Wave Therapy

Acoustic wave therapy (AWT) uses sound waves and energy to reduce cellulite and improve skin laxity in the dermis of the patient. The waves break down the tough bands under the skin, targeting cellulite in the dermis, often seen in females, similar to subcision. This method targets septa, which causes dimpling. AWT requires several sessions for visible improvement.

Patients often undergo 6-10 treatments. Each session lasts about 30 minutes. Results can be seen within a few weeks. Studies show this therapy improves skin texture and elasticity.

Laser Treatments

Laser treatments like Cellulaze™ offer long-lasting results. This method involves inserting a tiny laser fiber under the dermis to treat cellulite. The laser heats up, breaking down the tough septa bands in the dermis to treat cellulite, similar to subcision devices.

The procedure also stimulates collagen production. Collagen helps in making the skin smoother and firmer. Most patients see significant improvement after one treatment. Results may last for at least a year or more, bottom line.

Subcision with Cellfina™

Subcision is another effective method for cellulite removal. Cellfina™ is a popular device used in this technique. It releases the fibrous septa bands causing dimples.

This procedure, called subcision, uses a small blade to cut through these septa in the dermis to treat cellulite. It’s minimally invasive and performed under local anesthesia. Patients usually see results within three days.

Vacuum-Assisted Precise Tissue Release

Vacuum-assisted precise tissue release is another proven method. This technique cuts the tough septa bands using a special device with vacuum suction to treat cellulite in the dermis.

The vacuum lifts the skin while cutting through the septa bands underneath it, targeting cellulite in the dermis with these devices, et al. The result is smoother skin with fewer dimples. Effects from this treatment on cellulite can last up to three years in females, according to clinical studies on devices affecting the dermis.

Exploring Acoustic Wave Therapy

How it works

Acoustic wave therapy uses sound waves to reduce cellulite. The device emits acoustic waves that penetrate the skin. These waves break down the fibrous bands under the skin, reducing cellulite in females by targeting the septa, et al.

The broken bands release trapped fat cells. This process smooths out the skin’s surface. Acoustic wave therapy also increases blood flow, stimulates collagen production, and reduces cellulite in females.

Treatment sessions

Multiple sessions are needed for optimal results. Each session typically lasts about 30 minutes. Most patients require 6-12 sessions.

Sessions are usually spaced one week apart. This schedule allows the skin to recover between treatments. Consistency is key for achieving noticeable improvements.

Research studies

Several studies support the effectiveness of acoustic wave therapy. A study published in Dermatologic Surgery in 2015 showed significant cellulite reduction in females after six sessions, according to et al, with changes observed in the septa.

Another study in the Journal of Cosmetic and Laser Therapy found similar results in females with cellulite and septa. Participants experienced a visible improvement in skin texture and elasticity, et al., including reduced cellulite and smoother septa.

Insights into Laser Treatments

Laser Process

Laser treatments for cellulite use light to target fat cells. The laser energy heats the fat cells and breaks them down, et al, reducing cellulite. Cosmetic surgeons then remove the damaged cells and cellulite through small incisions in the septa. This process reduces the appearance of cellulite.

During the treatment, patients lie on a table. The cosmetic surgeon uses a handheld device to deliver the laser energy for cellulite and septa. Sessions last about an hour. Most people need several sessions for best results.

Cellulaze™

Cellulaze™ is a popular laser treatment for cellulite removal. It uses a special fiber-optic laser inserted under the skin to target cellulite and septa. This method targets the structure causing cellulite directly.

The procedure involves three steps:

  1. The laser melts fat pockets.
  2. It releases fibrous bands pulling down the skin.
  3. It stimulates collagen production to thicken and tighten skin.

Patients usually see noticeable improvements after one session. Results can last for years with proper care.

Duration of Results

Laser treatments offer long-lasting results compared to topical agents or other methods for cellulite and septa. Many patients experience smoother skin for six months to a year after their final cellulite session.

Proper maintenance helps extend these benefits:

  • Maintain a healthy diet.
  • Exercise regularly.
  • Avoid significant weight fluctuations.

e may need touch-up treatments every few years to maintain optimal cellulite results.

Subcision and Its Benefits

Subcision Process

Subcision is a technique used to treat cellulite. It involves breaking the fibrous bands under the skin. These bands cause dimpling on the surface. One popular method is Cellfina™.

Cellfina™ targets the subdermal junction where these fibrous bands causing cellulite are located. A small needle is inserted under the skin. The needle cuts through the bands, releasing them. This allows the skin to bounce back and smooth out cellulite.

Long-Term Effectiveness

Studies show that subcision can be very effective. Results from Cellfina™ for cellulite can last up to two years or more, et al. Many women report high levels of subject satisfaction with this cellulite treatment, et al.

The durability of results makes subcision appealing. Unlike some treatments that need frequent sessions, subcision offers long-lasting effects for cellulite, et al. This reduces both time and financial investment over the long term.

Minimally Invasive Nature

Subcision is also minimally invasive. This means it doesn’t involve major surgery, cellulite, or long recovery times et al. Most people can return to normal activities within a day or two.

This minimally invasive nature makes it an attractive option for those who want quick results without significant downtime, especially in treating cellulite. The procedure typically takes less than an hour, making it convenient for busy schedules and addressing cellulite.

Vacuum-Assisted Tissue Release

How It Works

Vacuum-assisted tissue release uses vacuum suction, et al., to combat cellulite. A device creates a vacuum that pulls the skin and underlying tissue upward, addressing cellulite et al. This process breaks the fibrous bands causing dimples in the skin, et al, leading to cellulite.

The procedure involves inserting a small blade beneath the skin to treat cellulite. The vacuum lifts the tissue, making it easier to cut these fibrous bands, et al., reducing cellulite. This results in smoother skin.

Duration of Effectiveness

Many patients see long-lasting results from this treatment. Some experience benefits for up to three years. The longevity of results depends on individual factors like skin type, lifestyle, and cellulite.

Innovative Technology

This method is innovative because it uses vacuum technology to address cellulite directly. Traditional methods often focus on surface treatments or temporary fixes for cellulite. Vacuum-assisted tissue release targets the root cause of cellulite by breaking down fibrous septa.

Using biomechanical forces, this technique helps realign connective tissues, reduce cellulite, and improve overall skin texture. It also promotes better blood flow and lymphatic drainage, enhancing skin health and reducing cellulite.

Benefits Over Other Methods

Compared to other cellulite treatments, vacuum-assisted tissue release offers several advantages:

  • Long-lasting results
  • Minimal downtime
  • Targeted approach

Patients can return to their normal activities quickly after the cellulite procedure. Many find this method more effective than creams or massages for cellulite.

Real-Life Examples

Consider Sarah, who struggled with cellulite for years despite trying various treatments. She opted for vacuum-assisted tissue release for cellulite and saw significant improvement within weeks. Her confidence soared as her skin became smoother and firmer, reducing cellulite.

John also benefited from this treatment after experiencing volume loss and cellulite in his thighs due to aging. The procedure helped restore his skin’s appearance, reducing cellulite and making him feel rejuvenated.

Investigating Other Effective Options

Carboxytherapy

Carboxytherapy involves injecting carbon dioxide gas into the skin. This treatment aims to improve blood flow, reduce cellulite, and stimulate collagen production. Studies report significant improvement in skin elasticity and texture. Subjects typically undergo multiple sessions for optimal results. The procedure targets the affected areas, helping reduce the appearance of cellulite.

Creams and Lotions

Topical treatments can also be effective. Creams containing caffeine or 0.3% retinol have shown promising results for cellulite. Caffeine helps by dehydrating fat cells, making cellulite less noticeable. Retinol works by thickening the skin, which can reduce the visibility of cellulite bands. Regular use is essential for these products to work effectively on cellulite.

Endermologie®

Endermologie® uses a mechanical device to deeply massage the skin and target cellulite. This technique improves circulation and lymphatic drainage, which can help reduce cellulite. Some studies show that it provides temporary effects on cellulite after several sessions. However, results vary among individuals.

Radiofrequency Treatments

Radiofrequency (RF) treatments use energy waves to heat the deep layers of skin, targeting cellulite. This stimulates collagen production and tightens tissues, reducing cellulite and leading to smoother skin texture. Devices like Venus Legacy™ are popular for this purpose. RF treatments usually require multiple sessions for noticeable changes.

Treatments with Uncertain Outcomes

Ionithermie

Ionithermie is a popular cellulite treatment. However, its effectiveness has mixed reviews. Some patients report temporary improvements. Others see no change at all. Clinical trials are limited in scope.

A typical session lasts about an hour. It involves applying a mixture of algae, clay, and essential oils to the skin for cellulite. An electric current then stimulates muscle contractions.

Deep Massage

Deep massage can temporarily reduce the appearance of cellulite. Techniques like Endermologie use rollers and suction to lift the skin and reduce cellulite. This helps improve blood flow and lymphatic drainage.

Results are usually short-lived. Patients often need several sessions for noticeable effects. The benefits typically last only a few days to weeks for cellulite.

Creams and Lotions

Many creams claim to reduce cellulite. Their effectiveness is often debated by experts. Ingredients like caffeine and retinol aim to tighten the skin and reduce cellulite.

Clinical evidence is sparse. Most studies show minimal improvement, if any. Patients may experience slight changes in skin texture but not significant reduction in cellulite.

Non-Invasive Procedures

Non-invasive procedures include laser therapy and radiofrequency treatments. These aim to break down fat cells without surgery.

Results vary widely among patients. Some see moderate improvements after several treatments. Others report no change or even adverse effects like burns, blisters, or cellulite.

Injectable Treatments

Injectable treatments involve substances injected into the affected area to dissolve fat cells, reduce cellulite, or stimulate collagen production.

The outcomes are inconsistent across different clinical trials. Some patients achieve smoother skin and reduced cellulite, while others face side effects such as bruising or swelling.

Unrecommended Options for Removal

Creams and Lotions

Many creams and lotions claim to remove cellulite. They often promise quick results. These products usually contain caffeine or retinol. However, there is little evidence they work long-term.

e people may see temporary changes. This happens because the skin tightens slightly. But the effects are often minimal and not permanent. Always check with a healthcare professional before using these cellulite products.

Massage Devices

Massage devices are popular for cellulite removal. They include rollers and electric massagers. The idea is to break down fat cells and cellulite through pressure.

However, studies show mixed results. Some users report smoother skin temporarily. But this doesn’t last long-term. There is no strong scientific proof that massage devices remove cellulite permanently.

Dietary Supplements

Dietary supplements claim to target unwanted fat and reduce cellulite. Ingredients like green tea extract or collagen are common in these cellulite pills.

Yet, these claims lack substantial research backing them up. Taking supplements without consulting a doctor can be risky. Some ingredients might interact with medications or cause side effects.

Laser Treatments

Laser treatments aim to break down fat cells and reduce cellulite under the skin. They are expensive and require multiple sessions over years to see any effect on cellulite.

Despite their popularity, results vary widely among individuals. Some people experience minor improvements, while others see none at all. Consult a healthcare provider before considering laser treatments.

Wraps and Bandages

Body wraps and bandages often promise quick fixes for cellulite removal. These methods involve wrapping the body in special materials to sweat out toxins.

While they may lead to temporary water loss, they do not remove cellulite permanently. The effects are short-lived, lasting only until you rehydrate.

Cellulite Suction Devices

Cellulite suction devices claim to smooth out dimpled skin by creating a vacuum effect on the skin surface.

However, there is no solid evidence supporting their effectiveness for long-term cellulite removal. Improper use can lead to bruising or skin damage.

Home Remedies

Home remedies like coffee scrubs or homemade masks are also popular for tackling cellulite issues.

These methods lack scientific support and often provide no real benefits beyond temporary skin smoothing due to exfoliation.

Final Remarks

You’ve explored a variety of cellulite treatments, from proven methods to those with uncertain outcomes. Each option offers unique benefits and potential drawbacks. Your choice should align with your goals and comfort level.

Ready to take the next step? Consult with a specialist to find the best treatment for you. Don’t let cellulite hold you back any longer. Act now and reclaim your confidence!

Frequently Asked Questions

What is the most effective cellulite removal treatment?

Laser treatments are highly effective. They break down fat cells and stimulate collagen production, leading to smoother skin.

How does Acoustic Wave Therapy work for cellulite?

Acoustic Wave Therapy uses sound waves to improve blood flow and reduce fat deposits. It enhances skin texture and firmness.

Are there any risks associated with subcision?

Subcision may cause bruising, swelling, or minor scarring. However, it effectively releases fibrous bands causing cellulite.

Can Vacuum-Assisted Tissue Release permanently remove cellulite?

Yes, it can offer long-lasting results by cutting fibrous bands under the skin, allowing fat to redistribute evenly.

What are some other effective cellulite treatments?

Other options include radiofrequency treatments and topical creams containing retinol or caffeine. These improve skin elasticity and texture.

Why are some treatments not recommended for cellulite removal?

e methods lack scientific backing or pose significant risks. Always consult a dermatologist before trying new treatments.

Do all cellulite treatments deliver guaranteed results?

No, outcomes vary based on individual factors like skin type and severity of cellulite. Consult with a specialist for personalized advice.

Inner Thigh Liposuction Recovery Tips & Before and After Photos

Understanding Thigh Liposuction

Reasons for Liposuction

Many opt for thigh liposuction to achieve a slimmer appearance. They aim to reduce fat in the inner thighs and outer thighs. This can help create a more defined thigh gap. Some seek the procedure for health reasons. Excess fat in the thighs can cause discomfort and friction, leading to skin problems.

Others choose lipo treatment to improve their self-esteem. Feeling good about one’s body is important. Thigh lipo can boost confidence by enhancing one’s natural shape.

Inner vs Other Types

Inner thigh liposuction targets fat stores specifically in the inner thighs. This area tends to hold stubborn fat that is hard to lose with diet and exercise alone. The goal is often to create a smoother contour and slimmer upper thigh.

Other types of liposuction may target different areas, such as the abdomen or hips. These procedures focus on removing fat from larger regions of the body. The outcomes vary based on the area treated and the amount of fat removed.

Realistic Expectations

Having realistic expectations is crucial for anyone considering thigh lipo. Results are not instant; it takes time for swelling to subside and final results to appear. Patients should understand that while lipo can enhance their shape, it’s not a substitute for weight loss.

Choosing a qualified surgeon is equally important. A skilled professional ensures safety and better results. Look for board-certified surgeons with experience in inner thigh liposuction.

Incisions and Techniques

Small Incisions

Surgeons make small incisions during inner thigh liposuction. These incisions are usually less than a centimeter long. They place them in hidden areas, like the groin or near the buttocks. This helps to minimize visible scars.

Small incisions allow for precise fat removal. Surgeons use thin tubes called cannulas to suction out the fat. The goal is to create a smooth and natural contour.

Upper Thigh Lipo

e cases involve only mild to moderate upper thigh lipo. This technique targets fat deposits in the upper part of the inner thighs. It’s less invasive and requires fewer incisions.

Patients with small bulges benefit from this approach. Recovery time is shorter compared to more extensive procedures.

Medial Inner Thigh Technique

The medial inner thigh down to medial knee technique is more aggressive. Surgeons use this when patients have larger fat deposits in their thighs and knees.

This method involves multiple treatment areas. Surgeons start at the inner thigh and work down to the knee. It provides a dramatic reduction in size but requires a longer recovery period.

Surgeon’s Expertise

The surgeon’s expertise plays a crucial role in selecting the right technique. They assess each patient’s body type during consultation appointments.

Experienced surgeons tailor their approach based on individual needs. They consider factors like skin elasticity, fat distribution, and desired results.

Sculpting and Contouring

Incisions are strategically placed for optimal sculpting. Surgeons aim for even fat removal, avoiding uneven surfaces or “saddle bags.”

Precise sculpting improves the overall look of the legs. Patients often notice smoother contours after healing.

Post-Procedure Care

After surgery, patients wear compression garments. These garments help reduce swelling and support healing tissues.

Wearing these garments ensures better results by maintaining the new shape of the thighs.

Visualizing Results with Before and After Photos

Setting Expectations

Viewing before and after photos helps set realistic expectations. Many women look at these images to understand potential outcomes. Seeing the change in others can provide a clear picture of what to expect.

Photos show how inner thigh liposuction can change the body’s appearance. They highlight improvements in thigh contour and proportion.

Individual Variations

Individual results vary based on several factors. Skin elasticity, body shape, and the amount of fat removed play key roles. Patients with good skin elasticity tend to see better outcomes.

Body shape also influences results. People with different body shapes may experience varying levels of improvement.

Improved Thigh Contour

Before and after photos illustrate improved thigh contour post-surgery. These images often show smoother, more toned thighs. The procedure aims to create a balanced look between the hips, legs, and buttocks.

Improved blood flow is another benefit seen in these photos. Better circulation can enhance overall leg health.

Real-Life Examples

Real-life examples provide insight into possible results. One person might see dramatic changes, while another sees subtle improvements. These differences underscore the importance of personalized goals.

Photos help visualize how walking and daily activities might feel post-surgery. A more defined thigh contour can make movement easier for many people.

Candidate Considerations

Not everyone is an ideal candidate for inner thigh liposuction. Viewing before and after photos helps determine if this procedure aligns with personal goals.

Candidates should consider their overall health and specific goals when evaluating these images.

Recovery Timeline and Tips

Immediate Recovery

The first few days after inner thigh liposuction are crucial. Patients often experience swelling and bruising. It’s common to feel discomfort, which can be managed with prescribed pain medication. Rest is essential during this period.

Returning to Work

Most people can return to work within a week. Light duties are recommended at first. Avoid strenuous activities or heavy lifting. This helps prevent complications and supports healing.

Resuming Activities

Full physical activity should wait for about 4-6 weeks. Gentle walking is encouraged early on to promote blood circulation. Strenuous exercise should be avoided until cleared by the surgeon.

Minimizing Swelling

Swelling is a common post-operative symptom. Wearing compression garments can help reduce it significantly. These garments support the treated area and improve blood flow.

Gentle walking also helps in reducing swelling. It promotes circulation without putting too much strain on the body.

Reducing Discomfort

Discomfort can be minimized by following specific tips:

  • Take prescribed medications as directed.
  • Use cold compresses to alleviate pain and reduce swelling.
  • Elevate your legs when resting to decrease fluid buildup.

These steps can make the recovery process more comfortable.

Post-Operative Care Instructions

Following the surgeon’s instructions is crucial for optimal healing. Adhering to these guidelines ensures better results and reduces risks of complications.

Surgeons typically provide a detailed treatment plan that includes:

  1. Medication schedule – When and how to take prescribed drugs.
  2. Wound care – How to clean and dress incisions properly.
  3. Activity limitations – What activities to avoid during recovery.
  4. Follow-up appointments – Schedule for check-ups to monitor progress.

Managing Side Effects

Common Side Effects

Inner thigh liposuction can cause swelling, bruising, and temporary numbness. Swelling is the body’s natural response to surgery. It helps with healing but can be uncomfortable. Bruising happens because blood vessels get damaged during the procedure. Temporary numbness occurs when nerves are affected.

Many patients experience these side effects in the first week. They usually improve over time. Women might notice these symptoms more due to skin sensitivity.

When to Consult a Doctor

It’s important to know when to seek medical help. If swelling or bruising gets worse after a week, consult a doctor. Persistent numbness beyond a few weeks may indicate nerve damage.

Signs of infection include:

  • Redness
  • Warmth around the area
  • Fever

If any of these occur, contact your healthcare provider immediately.

Managing Swelling

Elevating your legs can reduce swelling. Use pillows to prop up your legs while resting. Compression garments also help by applying gentle pressure.

Drink plenty of water to flush out fluids. Avoid salty foods that can increase water retention.

Dealing with Bruising

Bruising fades over time but can be managed with cold compresses. Apply ice packs wrapped in cloth for 15 minutes several times a day.

Avoid strenuous activities that might worsen bruising. Gentle walks are okay and can promote blood circulation.

Addressing Numbness

Temporary numbness should improve as nerves heal. Gently massaging the area can stimulate nerve endings and restore sensation.

If numbness persists, discuss it with your doctor during follow-up visits.

Exercise and Activity

Light exercise speeds up recovery by improving blood flow and reducing stiffness. Walking is a great way to stay active without straining the body.

Avoid high-impact exercises until cleared by your doctor. Gradually return to your regular workout routine over time.

Diet and Hydration

A balanced diet aids recovery by providing necessary nutrients for healing. Include fruits, vegetables, lean proteins, and whole grains in meals.

Staying hydrated helps reduce swelling and supports overall health. Aim for at least eight glasses of water daily.

Rest and Recovery Time

Rest is crucial for healing after inner thigh liposuction. Take breaks throughout the day to avoid overexertion.

Listen to your body’s signals and give it time to recover fully before resuming normal activities.

Skin Tightening Post-Procedure

Non-Surgical Options

Non-surgical options can help enhance skin retraction after inner thigh liposuction. Radiofrequency treatments are popular. They use energy to heat the skin, promoting collagen production. This helps tighten loose skin.

Ultrasound therapy is another option. It targets deeper layers of the skin with sound waves. This stimulates tissue repair and improves elasticity. Both methods are safe and effective for most patients.

Laser Lipo Treatments

Laser lipo treatments offer conservative yet effective results for skin tightening. They use laser energy to liquefy fat cells before removal. The laser also heats the surrounding tissues, encouraging collagen growth.

Patients often see a more youthful appearance post-procedure. Laser lipo treatments have minimal downtime compared to traditional methods. Results are usually visible within a few weeks, with improvements continuing over several months.

Importance of Stable Weight

Maintaining a stable weight is crucial after inner thigh liposuction. Fluctuations in weight can affect skin elasticity and overall results. Gaining weight may cause new fat deposits to form in treated areas.

A balanced diet and regular exercise help keep weight stable. Consult a nutritionist if needed for personalized advice. A healthy lifestyle supports long-term benefits from the procedure.

Role of Compression Garments

Compression garments play an essential role post-liposuction. They help reduce swelling and support healing tissues. Wearing them as directed by your plastic surgeon ensures better results.

These garments also assist in shaping the treated area, providing smoother contours. Most patients need to wear them for several weeks post-surgery.

Managing Cellulite

Cellulite can be a concern for some patients after liposuction. While liposuction removes fat, it doesn’t always address cellulite directly. However, certain non-surgical treatments can help manage it.

Laser treatments and radiofrequency therapies target cellulite effectively. They break down fibrous bands under the skin, reducing its appearance. Consistent treatment sessions yield the best results.

Cost Overview

Factors Influencing Cost

Several factors influence the cost of inner thigh liposuction. The extent of the area treated is crucial. Larger areas require more time and effort, increasing costs.

Another factor is the patient’s body size. Patients with higher body fat may need more extensive treatment, which can raise the price. Surgeons also consider the patient’s overall health and weight.

Geographic Location

Geographic location significantly impacts cost. In major cities, prices tend to be higher due to increased demand and living costs. For example, procedures in New York or Los Angeles often cost more than those in smaller towns.

Surgeon expertise also plays a role. Experienced surgeons with positive reputations usually charge more for their services.

Price Range

The price range for inner thigh liposuction varies widely. On average, it can cost between $2,000 and $5,000 per session. This estimate includes surgeon fees, anesthesia, and facility costs.

However, some cases may exceed this range based on specific needs or complications.

Value of Quality Care

Investing in a skilled surgeon and quality care is essential. Choosing the lowest price option can result in poor outcomes or complications. Skilled surgeons ensure safer procedures and better results.

Patients should prioritize quality over cost when making decisions about their health.

Summary

Thigh liposuction can be a game-changer for those looking to sculpt their inner thighs. You’ve learned about the procedure, recovery tips, and managing side effects. Visualizing results and understanding costs are crucial steps in making an informed decision.

Ready to take the next step? Consult with a qualified specialist to explore your options. Your journey to smoother, tighter thighs starts now. Don’t wait—get the body you deserve!

Frequently Asked Questions

What is inner thigh liposuction?

Inner thigh liposuction removes excess fat from the inner thighs. It helps contour and slim the area, enhancing overall leg appearance.

How are incisions made during thigh liposuction?

Small incisions are made in inconspicuous areas. Surgeons use specialized techniques to minimize scarring and optimize results.

Can I see before and after photos of inner thigh liposuction?

Yes, many clinics offer before and after photos. These images help visualize potential results and set realistic expectations.

What is the recovery timeline for inner thigh liposuction?

Recovery typically takes 1-2 weeks. Most patients return to normal activities within this period, but full recovery can take a few months.

Are there side effects from inner thigh liposuction?

Common side effects include swelling, bruising, and temporary numbness. These usually subside within a few weeks post-procedure.

Does skin tighten after inner thigh liposuction?

Skin tightening varies by individual. Some may experience natural tightening post-procedure, while others might need additional treatments.

How much does inner thigh liposuction cost?

Costs vary based on location, surgeon expertise, and procedure complexity. On average, it ranges from $3,000 to $5,000.

Hard Lump After Liposuction? Expert Tips to Massage It Away

Key Takeaways

  • Lumps After Liposuction Are Common: It’s normal to experience lumps, bumps, and a lumpy appearance after liposuction due to swelling, fluid accumulation, skin irregularities, and fat necrosis.
  • Causes of Lumps: Lumps, bumps, and skin irregularities can result from several factors, including the body’s healing process, uneven fat removal during liposuction surgery, or improper aftercare, leading to a lumpy appearance.
  • Self-Resolution of Lumps: Many lumps and bumps tend to resolve on their own within a few weeks to months as the body initiates a healing response.
  • Effective Massaging Techniques: Regularly massaging the affected areas after liposuction surgery can help break down lumps and bumps, improve circulation, and aid faster healing response and recovery.
  • Role of Compression Garments: Wearing compression wear as advised by your surgeon after liposuction surgery can significantly reduce lump formation, bumps, and fibrosis, promoting a smoother appearance.
  • Consult Your Doctor When Needed: If lumps, bumps, or irregularities persist or cause concern, it’s essential to consult your doctor for professional advice and potential treatments such as liposuction surgery to improve appearance.

Understanding Lumps After Liposuction

Common Side Effect

Lumps are a common side effect of liposuction surgery. This happens due to the invasive nature of the liposuction procedure, which can cause bumps. During liposuction, a cannula is inserted under the skin to remove fat. The insertion and movement of the cannula during liposuction can disrupt tissues.

Cannula’s Impact

The use of a cannula in liposuction can lead to lump formation. The mechanical action of liposuction breaks down fat cells and alters tissue structure. Disruption in tissue from liposuction can cause uneven surfaces under the skin. This might result in lumps that patients notice post-liposuction surgery.

Swelling and Blood Accumulation

Lumps often consist of swelling and localized blood accumulation. Swelling is a natural response to any surgical procedure. Blood vessels may break during liposuction surgery, causing blood to pool in certain areas. This pooling creates hard lumps.

Residual Fat

Residual fat also contributes to lump formation after liposuction. In some cases, not all fat cells are removed evenly during liposuction. Uneven fat removal leaves pockets of residual fat behind. These pockets can feel like hard lumps under the skin, often requiring liposuction.

Healing Process

The healing process plays a significant role in lump resolution after liposuction. Over time, the body reabsorbs excess fluids and blood. Swelling gradually decreases as tissues heal. Most lumps tend to soften within weeks or months after liposuction surgery.

Managing Lumps

There are ways to manage lumps after liposuction:

  • Massaging the affected area helps improve circulation.
  • Wearing compression garments reduces swelling.
  • Following post-operative care instructions ensures better recovery.

Are Lumps Normal Post-Procedure

Normal Healing

Lumps after liposuction are a normal part of the healing process. These lumps form as your body reacts to the liposuction procedure. The tissue under the skin needs time to settle and heal after liposuction.

Most patients will notice these lumps within the first few weeks after liposuction. They can feel hard and uneven. This is usually due to swelling and fluid buildup.

Varying Degrees

Not all patients experience lumps to the same degree. Some may have small, barely noticeable lumps. Others might find larger, more pronounced ones.

Factors like liposuction, the area treated, and individual healing processes play a role. Body’s response to surgery varies from person to person.

Monitoring Changes

Monitoring lumps for changes is crucial in post-operative care. Watch for any increase in size or changes in texture. Pain levels should also be noted.

If a lump becomes painful or grows, contact your doctor immediately. Early detection of complications can prevent further issues.

Professional Help

Seeking help from healthcare professionals is important if you notice unusual changes. Regular follow-ups with your surgeon ensure proper healing.

Causes Behind Post-Lipo Lumps

Cannula’s Role

The cannula used in liposuction creates tunnels under the skin. These tunnels can lead to temporary lumpiness. The cannula is a thin tube that suctions out excess fat. As it moves, it disrupts the fat cells and tissues. This disruption sometimes causes swelling or lumps to form.

Hematoma and Seromas

Lump formation can also result from hematomas or seromas. A hematoma occurs when blood collects under the skin. Seromas happen when lymph fluid accumulates in pockets. Both conditions contribute to lumpiness after liposuction. They usually resolve on their own but may need medical attention if persistent.

Uneven Fat Removal

Uneven fat removal can cause more persistent lumps. If the surgeon does not evenly remove fat, some areas might have residual fat deposits. These deposits create an uneven surface, leading to noticeable lumps. Proper surgical technique is crucial to minimize this risk.

Fat Necrosis

Fat necrosis is another cause of post-lipo lumps. Fat necrosis happens when some fat cells die after surgery. The dead cells harden into lumps called nodules. These nodules can be felt under the skin and may take time to dissolve.

Scar Tissue Formation

Scar tissue formation can also lead to lumpiness. As the body heals, scar tissue forms at the surgical site. This scar tissue can feel like hard lumps under the skin, which might be tender or painful initially but often softens over time.

Do Lumps Vanish on Their Own

Natural Dissipation

Most lumps will dissipate naturally as the body heals. After liposuction, the body works to adapt to its new contours. This process involves breaking down and absorbing the fat cells that were disrupted during surgery. The body’s natural healing mechanisms play a crucial role in this.

General Timeline

Patients usually start seeing improvements within a few weeks. Typically, swelling and lumps begin to reduce around 3-4 weeks post-surgery. By three months, many patients notice significant changes. Full recovery and final results can take up to six months or more.

Role of Healing Process

The body’s healing process is essential for resolving these side effects. It gradually smooths out skin irregularities and reduces swelling. Over time, the skin adjusts to the underlying tissues, which helps diminish any lumpy appearance.

Persistent Lumps

While most lumps disappear, some may persist longer. In rare cases, they might remain even after several months. If persistent lumps are bothersome, consulting with a healthcare provider is advisable.

Surgical Removal Option

For those with stubborn lumps, surgical removal is an option. This procedure involves removing remaining fat deposits or scar tissue under the skin. However, it’s typically considered only when other methods have failed.

Massaging Techniques for Lumps

Manual Drainage

Manual lymphatic drainage therapy helps reduce lumps. It facilitates fluid movement in the body. This technique is performed by trained therapists. They use light pressure and rhythmic strokes to stimulate the lymphatic system. The therapy can help speed up recovery after fat removal.

Gentle Massage

Patients can perform gentle, circular massage techniques at home. These massages help reduce bumpy areas and improve skin elasticity. Use your fingers to apply light pressure on the lump. Move in small, circular motions for about 10 minutes daily. This practice helps smoothen the skin surface and contours.

Professional Guidance

Consulting with a professional therapist is recommended. A therapist can provide personalized massage strategies tailored to individual recovery needs. They assess your specific condition and suggest effective techniques. Following their advice ensures proper care of fibrous tissue and better results.

Importance of Compression Wear

Skin Adaptation

Compression garments help the skin adapt smoothly to new body contours. After liposuction, the skin needs support to fit the body’s new shape. Wearing compression wear ensures that the skin remains tight and smooth over the treated area. This support helps prevent sagging and irregularities.

Blood Flow Benefits

Compression wear promotes better blood flow. Good circulation is essential for healing. Enhanced blood flow delivers more oxygen and nutrients to the tissues. This aids in faster recovery and reduces complications.

Swelling Reduction

One key benefit of compression garments is reducing swelling. Swelling is common after liposuction due to tissue trauma. Compression wear applies gentle pressure, which helps fluid move out of swollen areas. This decreases discomfort and speeds up healing.

Lumps Minimization

Using compression wear minimizes lump formation. Lumps can form when fluids accumulate under the skin. The pressure from the garment prevents this accumulation by distributing fluids evenly. As a result, it reduces the chances of developing hard lumps.

Proper Use Guidelines

Proper use of compression garments is crucial for optimal results. First, ensure the garment fits snugly but not too tight. It should provide consistent pressure without causing pain or restricting movement.

Wear the garment as directed by your surgeon. Typically, patients should wear it 24/7 for the first few weeks post-surgery, except when showering or washing it. After this initial period, wearing it part-time may be sufficient based on your doctor’s advice.

Regularly check for any signs of irritation or improper fit. The garment should cover all treated areas completely without rolling or bunching up.

Aftercare Tips to Minimize Lumps

Cold Compresses

Cold compresses help reduce swelling. Apply a cold pack to the treated area several times a day. Each application should last about 10-15 minutes. This practice can also ease discomfort and minimize lumps.

Stay Hydrated

Drinking plenty of water aids in healing. Aim for at least eight glasses of water per day. Proper hydration helps flush out toxins from the body. It supports the overall recovery process after liposuction.

Healthy Diet

A balanced diet is crucial for recovery. Include fruits, vegetables, lean proteins, and whole grains in your meals. Avoid processed foods and excessive sugar intake. A healthy diet provides essential nutrients that promote healing.

Gentle Physical Activities

Engage in gentle physical activities like walking. Walking enhances blood circulation and prevents fluid buildup in tissues. Start with short walks and gradually increase the duration as you feel comfortable.

Operative Care

Follow all post-operative care instructions given by your surgeon. Attend follow-up appointments to monitor your progress. Report any unusual symptoms or concerns immediately.

Consistent Routine

Maintain a consistent aftercare routine for best results. Incorporate cold compresses, hydration, a healthy diet, and gentle activities into your daily schedule.

When to Consult Your Doctor

Increase in Size

If the lump increases in size, consult your doctor. This could indicate a problem with the healing process. Lumps should gradually decrease in size as you recover. Sudden growth might mean complications.

Pain and Discomfort

Persistent pain or discomfort needs attention. Some soreness is normal after liposuction. However, if the pain worsens or becomes unbearable, it’s time to see a healthcare professional. They can determine if there is an underlying issue causing this pain.

Signs of Infection

Watch for signs of infection at the incision sites. Redness, swelling, or unusual discharge can indicate an infection. If you have a fever along with these symptoms, contact your doctor immediately. Infections need prompt treatment to prevent severe complications.

Follow-up Appointments

Follow-up appointments are crucial for monitoring recovery progress. These visits allow your doctor to check for any irregularities or side effects from the procedure. They can address concerns about lumps and ensure they are part of the natural healing response.

Fever and Unusual Discharge

A fever after surgery is not a common side effect and warrants immediate medical attention. Similarly, unusual discharge from incision sites should be reported right away. Both can be signs of serious complications that require prompt intervention.

Blood and Bruising

e bruising and minor blood spots are normal post-surgery. However, excessive bleeding or large bruises should be evaluated by a doctor. This might indicate issues with blood clotting or other complications needing medical care.

Healing Process Concerns

If you notice that your healing process seems off track, consult your physician. For instance, if lumps persist beyond the usual recovery period or worsen over time, it’s essential to get checked out.

Rest and Recovery Period

Proper rest during the recovery period is vital for healing. Overexertion can lead to complications like increased lump size or prolonged inflammation. Ensure you follow your doctor’s advice on activity levels during this time.

Summary

Lumps after liposuction can be concerning, but understanding their causes and how to manage them is crucial. Proper aftercare, including massage techniques and compression wear, plays a key role in reducing these lumps.

If you notice persistent lumps or any unusual changes, consult your doctor immediately. Your proactive approach ensures a smoother recovery process. Stay informed and take control of your post-lipo journey for the best results. Follow our tips, and don’t hesitate to reach out for professional advice.

Frequently Asked Questions

Are lumps normal after liposuction?

Yes, lumps are common post-liposuction. They usually form due to swelling and tissue healing.

What causes lumps after liposuction?

Lumps can be caused by fluid accumulation, tissue trauma, or uneven fat removal during the procedure.

Do these lumps go away on their own?

Most lumps will diminish over time as the body heals, typically within a few weeks to months.

How can I reduce lumps after liposuction?

Massaging the area and wearing compression garments can help reduce lumps and promote even healing.

When should I consult my doctor about post-lipo lumps?

If lumps persist beyond a few months or are painful, consult your doctor for further evaluation.

Is it necessary to wear compression garments after liposuction?

Yes, compression garments help minimize swelling and support smoother contouring of the treated area.

Can massaging techniques help with post-lipo lumps?

Yes, gentle massaging techniques can improve blood circulation and help break down scar tissue, reducing lumpiness.

Liposuction Buffalo Hump Cost & Recovery: What to Expect

Key Takeaways

  • Understanding Buffalo Hump Liposuction: This procedure targets excess fat accumulation on the upper back and neck through small skin incisions and surgical methods, offering a solution for those struggling with this specific issue while enhancing contour and promoting skin contraction.
  • Ideal Candidates for the Procedure: Suitable candidates are generally healthy individuals who have not responded to diet and exercise, are seeking a permanent solution through surgical methods, and are aiming for final results despite their medical condition and weight gain.
  • The Liposuction Procedure Explained: The process involves small incisions and fat removal through a cannula, often performed under local anesthesia, with surgical methods influencing skin contraction and contour, depending on several factors.
  • Cost Breakdown: Expect costs to range from $2,000 to $8,000 for the surgical procedure, varying based on surgeon experience, facility fees, and geographic location.
  • Effectiveness and Permanent Results: The procedure is highly effective, with results often being permanent if patients maintain a stable weight post-surgery and consider several factors.
  • Recovery and Healing Time: Typical recovery spans a few weeks after the surgical procedure, with most patients resuming normal activities within 1-2 weeks and full recovery in about 4-6 weeks.

Understanding Buffalo Hump Liposuction

What is Buffalo Hump?

A buffalo hump is a fat deposit located at the back of the neck. This condition can cause a visible bulge. It often affects physical appearance and self-esteem. People with a buffalo hump may feel embarrassed or self-conscious every day and avoid contact.

Causes of Buffalo Hump

Several factors can lead to a buffalo hump. Common causes include:

  • Obesity: Excess weight can result in fat deposits.
  • Medications: Some drugs, like steroids, can cause fat accumulation.
  • Cushing’s Syndrome: This condition involves high cortisol levels, leading to fat deposits.

Understanding the cause is crucial for effective treatment.

Impact on Self-Esteem

Having a buffalo hump can impact one’s confidence. The visible bulge might make people feel unattractive. They may avoid social situations or wear clothing to hide it. Addressing this issue can improve both appearance and mental health.

Liposuction as Treatment

Liposuction is an effective treatment for removing excess fat deposits. Surgeons use this procedure to target specific areas, including the buffalo hump. The process involves making small incisions and using a cannula to suction out fat.

Procedure Details

The liposuction procedure usually takes one to two hours. Patients receive local anesthesia or sedation. Surgeons make small cuts near the hump and insert the cannula. Fat cells are then removed through suction.

Recovery time varies but generally lasts a few weeks. Patients should follow post-operative care instructions for optimal results.

Consult Experienced Surgeons

Consulting experienced surgeons is vital for successful outcomes. Exert Clinic offers personalized treatment plans tailored to individual needs. Their team has expertise in buffalo hump liposuction procedures.

Ideal Candidates for the Procedure

Overall Health

Ideal candidates should be in good overall health. They need to have no serious medical conditions that could complicate surgery or recovery. Surgeons often evaluate patients’ medical history to ensure they are fit for the procedure. Being healthy reduces risks and promotes faster healing.

Stable Weight

Candidates must have a stable weight before considering liposuction. Fluctuating weight can affect results negatively. Maintaining a consistent weight helps achieve the best contouring outcomes. Weight stability ensures that the removed fat does not return quickly.

Realistic Expectations

Having realistic expectations is crucial. Liposuction is not a weight loss solution. It focuses on removing excess fat in specific areas like the buffalo hump. Understanding this helps set achievable goals and avoid disappointment.

Non-Smokers

Non-smokers make better candidates for liposuction. Smoking hinders healing and increases complications. For those who smoke, quitting weeks before surgery is advisable. This step improves overall health and surgical outcomes.

Localized Fat Deposits

Ideal candidates have localized fat deposits resistant to diet and exercise. The buffalo hump is one such area where traditional methods may fail. Liposuction targets these stubborn fat pockets effectively.

Good Skin Elasticity

Good skin elasticity is vital for optimal results. After fat removal, skin needs to contract smoothly over the new contours. Poor skin elasticity can lead to sagging and uneven results.

Emotional Readiness

Emotional readiness matters too. Candidates must be mentally prepared for surgery and recovery steps involved in liposuction process. Understanding potential risks and benefits helps in making informed decisions.

The Liposuction Procedure Explained

Anesthesia

Liposuction for a buffalo hump starts with anesthesia. Most patients receive local anesthesia. This numbs the area but keeps the patient awake. Some cases may require general anesthesia, putting the patient to sleep.

Incisions

Small incisions are made in the skin. These cuts allow the surgeon to insert a thin tube called a cannula. The number and size of incisions depend on the amount of fat deposits being removed.

Fat Removal

The cannula is moved back and forth. This motion breaks up fat cells in the targeted area. A suction device attached to the cannula then removes the loosened fat cells from the body.

Different Techniques

There are various liposuction techniques available:

Each technique has its benefits and risks. The choice depends on the patient’s needs and complexity of their case.

Pre-operative Evaluations

Before surgery, patients undergo thorough evaluations. Doctors assess overall health and specific areas needing treatment. Blood tests and imaging studies might be required.

Doctors also discuss medical history, allergies, and current medications. These steps ensure that the procedure is safe and effective.

Post-operative Care

After surgery, patients need rest. Compression garments help reduce swelling and support healing. Follow-up visits with the doctor monitor recovery progress.

Cost Breakdown

General Price Range

Buffalo hump liposuction typically costs between $2,000 and $8,000. The price varies based on several factors. One major factor is the surgeon’s experience. More experienced surgeons usually charge higher fees. Geographic location also plays a role. Procedures in larger cities often cost more than those in smaller towns.

Surgeon’s Experience

A highly skilled surgeon can charge more for their services. They bring years of practice and expertise to the table. This can result in better outcomes and lower risks. Opting for a less experienced surgeon might save money but could lead to complications.

Geographic Location

Where you get the surgery matters too. Prices are generally higher in metropolitan areas like New York or Los Angeles. Smaller cities or rural areas may offer lower prices but might lack specialized surgeons.

Additional Costs

The initial quote for liposuction might not include all expenses. Here are some additional costs to consider:

  • Anesthesia Fees: Anesthesia is crucial for comfort during surgery.
  • Operating Room Facilities: These fees cover the use of the surgical room.
  • Post-Surgery Garments: Special garments aid recovery and improve results.

These extra costs can add up quickly, increasing the overall price by several hundred to thousands of dollars.

Anesthesia Fees

Anesthesia is necessary for pain management during the procedure. An anesthesiologist administers it, ensuring you remain comfortable and safe. The fee for anesthesia can range from $500 to $1,500 depending on the type used and duration of surgery.

Operating Room Facilities

Using an operating room comes with its own set of charges. These fees cover equipment, staff, and sterilization processes required for a safe environment. Facility fees can vary widely but typically add another $600 to $1,200 to your bill.

Post-Surgery Garments

After surgery, patients need special garments to help reduce swelling and support healing tissues. These garments are designed specifically for post-liposuction recovery and can cost between $100 and $300 each.

Value Over Cost

Choosing a qualified surgeon should be a priority over finding the lowest cost option. A skilled surgeon ensures better results and minimizes risks of complications like infections or uneven fat removal.

Effectiveness and Permanent Results

Permanent Removal

Liposuction effectively removes fat cells from the buffalo hump area. This procedure targets and eliminates these cells permanently. The fat cells do not regenerate once removed. Patients often see a significant improvement in their appearance.

This permanent removal is a key benefit of liposuction. It provides long-lasting results. However, maintaining these results requires effort post-surgery.

Maintaining Results

Post-surgery, patients must maintain a stable weight. Weight fluctuations can affect the final results. A healthy lifestyle plays a crucial role in this.

Patients should follow a balanced diet and regular exercise routine. These habits help preserve the results achieved through liposuction.

Aging Effects

While liposuction removes fat cells permanently, aging can still impact the outcome. Skin elasticity decreases with age, affecting the appearance of the treated area.

Lifestyle factors also play a role. Poor diet or lack of exercise can lead to new fat deposits in other areas of the body. Therefore, it is essential to adopt healthy habits for long-term success.

Expertise Matters

The expertise of the surgeon performing the liposuction is vital. Skilled surgeons ensure safety and effectiveness during the procedure.

Experienced professionals minimize side effects and complications. They also provide better aesthetic results.

Choosing a qualified surgeon is crucial for achieving desired outcomes and maintaining safety standards.

Self-Care Post-Surgery

Self-care after surgery is important for healing and preserving results. Follow all post-operative instructions provided by your surgeon.

Common recommendations include:

  • Wearing compression garments
  • Avoiding strenuous activities
  • Attending follow-up appointments

By adhering to these guidelines, patients can enhance their recovery process and sustain their improved appearance.

Recovery and Healing Time

Recovery Timeline

Most patients experience a recovery time of about two to three weeks after liposuction. The first few days are the most uncomfortable. Pain and swelling are common. By the end of the first week, some relief is noticeable. Many can return to work within 10-14 days. Full recovery, allowing for all normal activities, often takes up to six weeks.

Post-Operative Care

Proper care is vital during recovery. Patients must wear compression garments for several weeks. These garments help reduce swelling and support healing tissues. Pain management is also crucial. Over-the-counter pain relievers or prescribed medications offer comfort.

Patients should:

  • Avoid strenuous activities for at least two weeks.
  • Keep the treatment area clean and dry.
  • Follow their surgeon’s specific instructions closely.

Common Side Effects

Swelling, bruising, and minor discomfort are typical post-surgery effects. Swelling may last for several weeks but diminishes over time. Bruising usually fades within two weeks.

Other side effects include:

  • Temporary numbness in the treated area
  • Minor fluid drainage from incisions
  • Mild scarring

These symptoms gradually improve as the body heals.

Managing Pain and Discomfort

Pain levels vary per individual and procedure extent. Following pain management guidelines ensures comfort during recovery. Cold compresses can alleviate swelling in the initial days post-surgery.

Maintaining a healthy lifestyle aids in faster healing:

  • Eating nutritious foods
  • Staying hydrated
  • Avoiding smoking and alcohol consumption

Returning to Normal Activities

Patients gradually resume normal activities based on their medical history and overall health. Light activities like walking can start within a few days post-surgery, promoting circulation and reducing blood clot risks.

By week four, many patients feel comfortable engaging in more physical tasks but should still avoid heavy lifting or intense exercise until fully cleared by their doctor.

Managing Scarring Post-Surgery

Incisions and Techniques

Surgeons make small incisions during liposuction. These incisions are usually less than a centimeter long. The size of the incision helps reduce scarring. Surgeons use advanced surgical methods to minimize visible scars. Proper technique can make scars nearly invisible over time.

Post-Operative Care

Proper care after surgery is crucial for minimizing scars. Following the surgeon’s instructions can significantly impact healing. Patients should:

  • Keep the incision area clean
  • Avoid strenuous activities
  • Wear compression garments as advised

Using silicone sheets or gel can also help reduce scar visibility.

Silicone Sheets and Gel

Silicone sheets or gel can be applied to the incision sites. They help keep the skin hydrated and promote healing. Studies have shown that silicone products reduce scar thickness and discoloration. Applying these regularly can make a difference in scar appearance.

Swelling and Bruising

Swelling and bruising are common after liposuction. These symptoms usually subside within a few weeks. Keeping swelling down can help with scar management too. Ice packs, elevation, and compression garments are useful for reducing swelling.

Anesthesia Effects

Local anesthesia is often used for liposuction procedures on the upper back. This type of anesthesia reduces discomfort during surgery. It also allows patients to recover faster compared to general anesthesia.

Skin Contraction

After liposuction, skin contraction occurs naturally as part of the healing process. The small incisions allow for better skin contraction, which helps improve overall results. This natural tightening helps scars blend in with surrounding skin over time.

Long-Term Scar Appearance

Scars from liposuction typically fade over time. Initially, they may appear red or raised but will become less noticeable as months go by. Most patients find their scars become barely visible within a year.

Financing and Consultation Options

Payment Plans

Exert Clinic offers various financing options. They have flexible payment plans that make the procedure more affordable. Patients can spread out the cost over several months.

Medical credit cards are also available. These cards often come with low or no interest rates for a set period. This helps patients manage their budgets better.

Insurance Coverage

Liposuction for a buffalo hump is usually considered cosmetic. Most insurance plans do not cover these types of procedures. However, it’s essential to check with your insurance provider.

e cases might be exceptions if deemed medically necessary. Always verify this information during your consultation.

Consultation Importance

A consultation is crucial for understanding costs. Exert Clinic provides personalized cost estimates during this meeting. Patients can discuss payment options and tailor them to their needs.

The consultation also allows patients to ask questions about the procedure. They can understand what areas will be treated and any potential risks involved.

Alternatives and Costs

During the consultation, alternatives to liposuction may be discussed. There could be less invasive methods available depending on the patient’s condition.

Knowing all possible options helps in making an informed decision. The fees for each alternative will vary, so detailed discussion is essential.

Contact Information

Patients should contact Exert Clinic directly to schedule consultations. The clinic staff can provide additional details about financing and alternatives available.

Closing Thoughts

Buffalo hump liposuction can be a game-changer for those struggling with this stubborn fat deposit. Understanding the procedure, costs, and recovery is key to making an informed decision. If you’re considering this surgery, consulting with a qualified professional is crucial.

Ready to take the next step? Schedule a consultation to explore your options and see if buffalo hump liposuction is right for you. Your journey to a smoother silhouette starts now. Don’t wait—embrace the change today!

Frequently Asked Questions

What is a buffalo hump?

A buffalo hump is a fat deposit located at the upper back, near the neck. It can be caused by various factors including obesity, certain medications, or medical conditions.

Who are ideal candidates for buffalo hump liposuction?

Ideal candidates are those in good health with localized fat deposits on the upper back. They should have realistic expectations and no contraindicating medical conditions.

How much does buffalo hump liposuction cost?

The cost varies based on the surgeon’s experience, location, and complexity of the procedure. On average, it ranges from $2,000 to $8,000.

Is buffalo hump liposuction effective?

Yes, it effectively removes excess fat deposits from the upper back. Patients often experience significant improvements in their appearance and comfort.

What is the recovery time for this procedure?

Recovery typically takes about 1 to 2 weeks. Most patients can return to work within a few days but should avoid strenuous activities for a few weeks.

Are the results of buffalo hump liposuction permanent?

Results are generally permanent if you maintain a stable weight and healthy lifestyle. Fat cells removed do not grow back.

How can I manage scarring post-surgery?

Follow your surgeon’s aftercare instructions closely. Use prescribed ointments and creams, keep incisions clean, and avoid sun exposure to minimize scarring.

Laser Skin Resurfacing Stretch Marks: Benefits & Risks

Key Takeaways

  • Laser Therapy Benefits: Laser skin resurfacing can effectively reduce the appearance of stretch marks in the treatment area, making your skin look smoother and more even after treatment sessions by stimulating elastin with light.
  • Understanding Risks: While generally safe, it’s important to be aware of potential risks like redness, swelling, and temporary discomfort in the treatment area.
  • Preparation is Key: Properly preparing for the procedure by following your dermatologist’s advice, laser technician’s guidance, and focusing on the treatment area can enhance results and minimize risks.
  • Post-Procedure Care: Adhering to post-treatment care instructions from your provider can speed up recovery, reduce risk, and improve the effectiveness of the treatment at every stage.
  • Cost Factor: Be prepared for the financial investment, as laser treatments for stretch marks can be pricey and often require multiple sessions with a provider.
  • Informed Decisions: Consult with a qualified provider to understand if laser therapy is the right choice for your specific skin type, stretch mark condition, treatment area, and stage.

Understanding Stretch Marks

Definition

Stretch marks are scars that form on the skin. They develop when the dermis tears during periods of rapid growth or weight gain, resulting in stretch marks that may require a laser technician at a later stage. These marks appear as streaks or lines on the skin.

Common Areas

Stretch marks can affect any part of the body. They are most commonly found on:

  • Stomach
  • Chest
  • Upper arms
  • Thighs
  • Buttocks

These areas often undergo significant changes, making them prone to developing stretch marks.

Role of Genetics

Genetics play a crucial role in the development of stretch marks. If your parents have stretch marks, you are more likely to get them too. The genetic predisposition can determine how elastic your skin is and how easily it might tear, potentially leading to stretch marks.

Hormonal Changes

Hormonal changes also contribute to stretch mark formation. During puberty, pregnancy, and other life stages with hormonal shifts, the skin’s elasticity can change, potentially leading to stretch marks. This makes it more susceptible to tearing, forming scars, and stretch marks.

Benefits of Laser Therapy

Collagen Growth

Laser therapy is highly effective in promoting collagen production. The laser targets the deeper layers of the skin, stimulating collagen growth and reducing stretch marks. This process helps repair damaged skin and reduces the appearance of stretch marks.

Collagen plays a crucial role in maintaining skin elasticity. Increased collagen production can make the skin look smoother and more youthful, reducing the appearance of stretch marks. As new collagen forms, it fills in the gaps caused by stretch marks.

Skin Cell Regeneration

Laser skin resurfacing encourages skin cell regeneration. The laser removes damaged outer layers of skin. This removal prompts the body to generate new, healthy cells.

New skin cells improve the texture and color of stretch marks. Regenerated skin appears more even-toned and less noticeable. This regeneration process enhances overall skin health.

Non-Invasive Solution

One major advantage of laser therapy is its non-invasive nature. Unlike surgical methods, there are no incisions, stitches, or stretch mark involved. Patients experience minimal discomfort during the procedure.

Non-invasive treatments for stretch marks mean there is no downtime required for recovery. People can resume their daily activities right after the session. This convenience makes laser therapy an attractive option for many individuals.

Enhanced Lymphatic Drainage

Laser treatment also boosts lymphatic drainage in the treated area. Improved lymphatic drainage helps remove toxins and waste products from the body more efficiently.

Better lymphatic function can reduce swelling and inflammation around stretch marks. This leads to a healthier appearance of the skin over time.

Improved Blood Circulation

Laser therapy improves blood circulation in targeted areas. Enhanced blood flow brings more oxygen and nutrients to the skin cells.

Improved circulation supports faster healing and rejuvenation of damaged tissues. Better blood flow contributes to healthier-looking skin with reduced visibility of stretch marks.

Risks of Laser Treatment

Common Side Effects

Laser skin resurfacing can have side effects. Pain and swelling are the most common. Pain usually occurs during or after the procedure. Swelling may last for several days. These symptoms are temporary but can be uncomfortable.

Discoloration is another risk. Skin may become darker or lighter than normal. This change is often temporary but can be permanent in rare cases.

Rare Complications

There are also rare complications. Scarring can occur if the laser damages deeper layers of skin. Infections are possible if bacteria enter the treated area.

These risks are uncommon but serious. Proper care minimizes these chances.

Importance of Expertise

Choosing a qualified practitioner is crucial. An experienced doctor reduces risks significantly. They know how to handle different skin types and conditions.

Ensure your practitioner has proper training and certification. Look for reviews and ask for before-and-after photos of previous patients.

Consultation Necessity

A thorough consultation is essential before treatment. Discuss individual risks based on your skin type and condition. The doctor will evaluate your medical history and current health status.

During this meeting, ask about potential side effects and how to manage them. Knowing what to expect helps in preparation and recovery.

Why Choose Laser

Effectiveness

Laser therapy is the most effective option for treating stretch marks. Other treatments lack the same level of success. Creams and lotions only provide temporary relief. They do not address the deeper layers of the skin. Laser treatment, however, targets both the surface and deeper layers. It stimulates collagen production. This leads to long-lasting results.

Permanent Results

Laser treatment offers permanent results for many people. Stretch marks fade significantly after a few sessions. Maintenance sessions may be needed over time. These help maintain the results achieved initially. The need for maintenance varies from person to person. Some may require annual touch-ups, while others might need them less frequently.

Pain Management

One benefit of laser therapy is reduced pain medication post-treatment. Traditional methods often require pain relief due to their invasive nature. Laser treatments are less invasive and usually cause minimal discomfort. Most patients report only mild redness or swelling after a session.

Technical Details

Lasers use concentrated light beams to treat stretch marks. Different types of lasers can be used depending on the severity of the marks:

  • Ablative lasers remove thin layers of skin.
  • Non-ablative lasers stimulate collagen without removing skin layers.

Both types have their pros and cons but are generally effective in reducing stretch marks.

Real-Life Experiences

Many people have shared positive experiences with laser treatments. For example, one patient noted significant improvement in her stretch marks after just three sessions. She did not need any pain medication afterward and was pleased with the smoothness of her skin.

Another patient reported that his stretch marks became almost invisible after six months of treatment and occasional maintenance sessions.

Preparing for Procedure

Avoid Sun Exposure

Avoid sun exposure two weeks before the procedure. This includes tanning beds. UV rays can damage the skin. Damaged skin may heal slower after the treatment.

Stop Skin Treatments

Stop using other skin treatments like waxing or chemical peels two weeks prior to laser resurfacing. These procedures can irritate the skin. Irritated skin may have a harder time recovering.

Avoid Skin Irritants

Stop using perfumes, deodorants, and any skin irritants in the treatment area. This helps prevent complications during and after the procedure. Clean, un-irritated skin heals better.

Medication Precautions

Avoid aspirin and anti-inflammatory drugs before the procedure. These medications increase bleeding risk. Herbal supplements should also be avoided for this reason.

Consult Your Doctor

Consult your doctor about any current medications you are taking. They will provide guidance on what to stop before the procedure. Follow their advice closely for a smooth healing process.

Plan Recovery Time

Plan for recovery time after the procedure. The natural healing process varies from person to person. Discuss expected recovery time with your surgeon beforehand.

Post-Procedure Expectations

Immediate Symptoms

Patients may experience redness, stinging, and mild swelling right after the procedure. These symptoms are common and typically last for a few days. The skin might feel tender to the touch.

Initial Care

Avoid applying makeup or lotion for the first 24 hours. This helps prevent irritation and allows the skin to heal properly. Keep the treated area clean and dry.

Moisturizing Importance

Moisturizing is crucial in the days following the procedure. Use a gentle, fragrance-free moisturizer. Keeping the skin hydrated aids in faster recovery and enhances results.

Realistic Timelines

Significant changes might not be visible immediately. Optimal results often take several weeks to appear. Patience is essential during this period as the skin continues to heal and regenerate.

Improvement Signs

Look for gradual improvement in skin texture and tone over time. Stretch marks will start to fade, but complete elimination might not occur. Results vary based on individual skin types and severity of stretch marks.

Follow-Up Visits

Schedule follow-up visits with your dermatologist to monitor progress. They can provide additional treatments if necessary.

Cost Considerations

Treatment Area

The cost of laser skin resurfacing for stretch marks varies. It depends on the size of the area being treated. Larger areas will cost more than smaller ones. For example, treating a small area like the upper arm might be less expensive compared to treating the abdomen.

Number of Sessions

Costs also depend on the number of sessions required. Some people need only a few sessions, while others may require more. Each session can last between 30 to 60 minutes. More sessions mean higher total costs.

Insurance Coverage

Most insurance plans do not cover laser treatment for stretch marks. This is because it is considered a cosmetic procedure. Cosmetic procedures are usually not deemed medically necessary.

Consulting Multiple Clinics

Consulting multiple clinics can help in comparing prices and payment plans. Different clinics may offer different rates for similar services. Some clinics might provide discounts for multiple sessions or offer financing options.

Provider Expertise

The expertise of the provider can affect costs as well. Experienced providers may charge more due to their skill level and reputation. However, choosing a skilled provider can lead to better results.

Payment Plans

Many clinics offer payment plans to make treatments more affordable. These plans allow you to pay in installments rather than a lump sum. It’s important to understand the terms and interest rates before agreeing to any plan.

Factors Affecting Cost

Several factors influence the cost of laser skin resurfacing:

  • Size of the treatment area
  • Number of sessions needed
  • Provider’s expertise
  • Clinic location

FAQs on Laser Therapy

Session Duration

Each laser therapy session lasts about 30 to 60 minutes. The exact time depends on the area treated. Larger areas take longer. Smaller spots need less time.

Number of Sessions

Most people need multiple sessions. Typically, three to five sessions are common. The number varies based on skin type and stretch mark severity.

Longevity of Results

Results can last several years. Proper care extends benefits. Follow-up treatments may be needed for best outcomes.

Pain Level

Many worry about pain during the procedure. The process is generally tolerable. A numbing cream is often applied beforehand. This reduces discomfort.

After the session, mild redness and swelling are normal. These effects usually fade within a few days.

Post-Treatment Care

Proper care post-treatment ensures lasting results:

  • Apply prescribed creams.
  • Avoid sun exposure.
  • Stay hydrated.
  • Follow any specific advice from your dermatologist.

Need for Follow-Up Sessions

Follow-up sessions help maintain results. They might be needed every year or two. This depends on skin condition and lifestyle factors.

Summary

Laser skin resurfacing offers a promising solution for those looking to reduce the appearance of stretch marks. With numerous benefits, such as improved skin texture and tone, it’s an option worth considering despite some risks. Proper preparation and post-procedure care are crucial for the best results.

Ready to take the next step in your skincare journey? Consult with a certified dermatologist to see if laser therapy is right for you. Embrace smoother, more confident skin today!

Frequently Asked Questions

How effective is laser skin resurfacing for stretch marks?

Laser skin resurfacing can significantly reduce the appearance of stretch marks. Results vary based on skin type and severity.

Is the procedure painful?

Most patients experience mild discomfort during the procedure. Topical anesthetics are often used to minimize pain.

How many sessions are needed?

Typically, 3-5 sessions are required for optimal results. The exact number depends on individual cases.

Are there any risks involved?

Common risks include redness, swelling, and temporary discoloration. Serious complications are rare but possible.

What should I do to prepare for the procedure?

Avoid sun exposure and discontinue certain skincare products as advised by your dermatologist before treatment.

How long is the recovery time?

Recovery time varies but usually ranges from a few days to a week. Follow your provider’s aftercare instructions closely.

Is laser treatment expensive?

Costs vary depending on the clinic and number of sessions needed. Consult with your provider for an accurate estimate.

Chemical Peels for Acne Scars: Banish Scars & Hyperpigmentation

Key Takeaways

  • Consult a Dermatologist: Always consult with a dermatologist to choose the right type of chemical peel, such as salicylic acid peels or depth peels, for your specific acne scars and skin type.
  • Proper Preparation: Follow all pre-procedure guidelines, including avoiding certain skincare products and medications, to ensure the best results for your acne treatment plan and cosmetic treatment.
  • Understand the Benefits: Chemical peels, a cosmetic treatment, can significantly reduce the appearance of acne scars and scarring, improve skin texture, and promote a more even skin tone.
  • Be Aware of Risks: Be informed about potential risks such as redness, irritation, and hyperpigmentation, skin conditions, and skin concerns, and discuss these with your healthcare provider.
  • Follow Post-Care Instructions: Adhere to post-procedure care instructions, including moisturizing and sun protection, to aid in healing and maximize the benefits of the chemical peeling.
  • Realistic Expectations: Understand that results vary and multiple sessions may be required for patients to experience improvement and achieve desired outcomes.

Understanding Chemical Peels

Definition and Purpose

Chemical peels, a cosmetic treatment, involve applying a chemical solution to the skin. This causes the outer layer to peel off. The primary purpose is to treat acne scars by removing damaged skin through chemical peel treatments such as light chemical peel and medium chemical peel. Chemical peeling helps reveal smoother, less scarred skin underneath.

Skin Rejuvenation Process

After a chemical peel, the skin goes through a rejuvenation process, often aided by skincare products and scar treatment for acne scars. New skin cells form as the old layer sheds. This leads to an improved texture and tone. Over time, scars become less noticeable.

Types of Chemical Peels

There are different types of chemical peels:

  • Light peels
  • Medium peels
  • Deep peels

Light peels use milder acids like salicylic acid. They are suitable for minor scars and skin concerns, requiring minimal recovery time with microneedling or light chemical peel treatments. Medium peels penetrate deeper into the skin and address more pronounced scars as part of an acne treatment plan.

Home Chemical Peels

Home chemical peels offer convenience but come with risks. These products may not be as strong as professional treatments for acne scars and chemical peel patients. Misuse can lead to burns or uneven results. Always follow instructions carefully when using home chemical peels.

Suitability for Different Skin Types

Chemical peels can benefit various skin types but work best on fair-skinned individuals as part of an acne treatment plan. Darker skin tones risk hyperpigmentation or discoloration after treatment. A dermatologist should evaluate your skin type before recommending a peel as part of an acne treatment plan.

Salicylic Acid Peels

Salicylic acid peels are popular for treating acne scars. Salicylic acid is effective in exfoliating the skin, unclogging pores, and treating acne breakouts. It reduces inflammation and redness associated with acne scars.

Choosing the Right Peel

Depth Options

Choosing the right depth of peel is crucial. Light peels target the top layer of skin. They are best for mild scars and sensitive skin. Medium peels penetrate deeper, addressing moderate scars, hyperpigmentation, and uneven skin texture as part of acne treatment. Deep peels reach the lower layers of skin, suitable for severe scarring like icepick scars and hyperpigmentation from acne breakouts.

Role of Dermatologists

Dermatologists play a key role in this process. They assess your skin type and scar characteristics. For example, individuals with darker skin tones may need different peel options to avoid hyperpigmentation and acne scars. A dermatologist ensures that the chosen peel is safe and effective for your specific skin concerns and condition.

Personalized Approach

A personalized approach is essential for successful results. Not all peels suit every person. Factors like skin type, scar severity, and overall health influence the choice of acne treatment for acne scars and chemical peel treatments. A tailored treatment plan maximizes benefits while minimizing risks.

Preparing for the Procedure

Pre-Procedure Consultation

A thorough consultation with a dermatologist is essential. Discuss expectations, potential risks, and outcomes. The patient must understand what to expect from the resurfacing procedure, including chemical peel treatments, scar treatment, and microneedling. Sharing details about previous treatments helps patients create an effective treatment plan.

Disclosing Medical History

Disclose any history of scarring, acne scars, cold sores, or facial X-rays. These factors, including skin condition, skin tone, and acne scars, can affect the treatment area and overall results for patients. Informing your dermatologist about these conditions ensures safer and more effective outcomes for patients, especially when dealing with acne scars, scar treatment, and chemical peel treatments.

Avoid Certain Medications

e medications can affect blood clotting or skin sensitivity. Avoid aspirin, ibuprofen, and certain supplements before the procedure. Following this advice reduces the risk of complications for patients during and after microneedling treatment for acne scars and other skin conditions.

Use of Topical Medications

Topical medications might be prescribed before the procedure. These could include retinoids to prepare the skin. Using these as directed enhances the effectiveness of the chemical peel for acne scars and scar treatment by rejuvenating skin cells through microneedling.

Importance of Sunscreen

Apply sunscreen regularly in the weeks leading up to the chemical peel treatments. Protecting your skin from UV rays is crucial for minimizing risks during treatment for patients with acne scars, microneedling, or a chemical peel. This step also helps patients in achieving better results post-procedure, whether it’s for acne scars, microneedling, or a chemical peel.

Possible Use of Antibiotics

Your dermatologist may prescribe topical or oral antibiotics to prevent infections and manage breakouts. This is especially important if you have a history of acne, breakouts, or other skin issues that could complicate healing for patients undergoing a chemical peel or microneedling.

Study Results and Recommendations

Studies show that proper preparation leads to better outcomes for patients with fewer side effects like swelling, breakouts, and acne scars. An open label study highlighted that patients who followed pre-procedure instructions for microneedling or a chemical peel experienced less discomfort.

Benefits of Chemical Peels

Improved Skin Texture

Chemical peels can significantly improve skin texture. The peeling process removes the outer layer of dead skin cells, helping with acne, breakouts, and scars. This reveals smoother and healthier skin underneath. Deep chemical peels are especially effective for this purpose.

Reduced Acne Scars

Chemical peels work well for reducing acne scars. They help by removing damaged skin layers. This promotes new skin growth. Over time, you may see a noticeable reduction in scar visibility from chemical peel, microneedling, or acne skin condition treatments.

Enhanced Complexion

Fair-skinned individuals often benefit the most from chemical peel treatments for acne and scar breakouts. These treatments, like chemical peel and microneedling, can enhance their complexion by evening out skin tone and addressing acne breakouts. This makes the skin look more radiant and youthful.

Suitability for Various Skin Types

Chemical peels come in different strengths to suit various skin types, including those with acne and breakouts or scar concerns. Light chemical peels are gentle and suitable for all skin types, helping with acne and breakouts. Deep chemical peels are more intense and best for severe acne scars compared to microneedling.

Effective Acne Treatment Option

Chemical peels are an excellent acne treatment option. They help unclog pores and reduce acne breakouts. This can lead to fewer future scars and a clearer complexion, especially when treating acne with chemical peel or microneedling.

Long-lasting Results

The results of chemical peel treatments for acne can be long-lasting with proper care, similar to microneedling. Regular maintenance through skincare products helps maintain the benefits achieved from the peel, microneedling, and acne treatments.

Risks Involved

Skin Color Changes

Chemical peels can cause changes in skin color. Hyperpigmentation is when the skin becomes darker than normal. This risk is higher for people with darker skin tones, especially when undergoing treatments like acne, chemical peel, or microneedling. Hypopigmentation, where the skin becomes lighter, can also occur. Both conditions might be temporary or permanent.

Scarring

Scarring is a serious risk of chemical peels. It happens more often with deep peels. People prone to keloids or hypertrophic scars should be cautious with microneedling, acne treatments, and chemical peels. Rolling scars and other acne scars may worsen if not treated properly with a chemical peel or microneedling.

Cold Sores Reactivation

Cold sores can reactivate after a chemical peel. The herpes simplex virus causes these sores. If you have a history of cold sores, inform your dermatologist before a chemical peel or microneedling. They may prescribe antiviral medication before the procedure.

Sun Sensitivity

After a chemical peel, microneedling, or acne treatment, the skin becomes very sensitive to the sun. Sun exposure can cause dark spots and other damage. Use sunscreen daily to protect your skin after the treatment, such as a chemical peel or microneedling.

Adverse Effects from Ingredients

Different types of chemical peels use various ingredients. High concentrations of acids like glycolic acid or salicylic acid are common in chemical peel treatments for acne and microneedling. These acids can cause adverse effects, such as acne, if not used correctly in treatments like chemical peel or microneedling. Always follow your dermatologist’s advice on post-peel care.

Infection Risk

Infections are rare but possible after a chemical peel. Bacteria can enter through broken skin layers during healing. Keep the treated area clean and avoid touching it with dirty hands after a chemical peel, microneedling, or acne treatment.

Redness and Swelling

Redness and swelling are common side effects of chemical peels, acne treatments, and microneedling. These symptoms, such as acne, usually subside within a few days to weeks, depending on the peel’s depth.

Fine Lines and Wrinkles

Though chemical peels aim to reduce fine lines and acne, some treatments might temporarily accentuate them due to initial swelling or peeling.

Depth Concerns

The depth of the peel affects its risks and benefits, especially for acne. Superficial peels have fewer risks but offer milder results. Deep peels provide more dramatic results for acne but come with higher risks and longer recovery times.

Inflammatory Lesions

People with active acne should be careful with chemical peels as they can irritate inflammatory lesions further, potentially worsening their condition.

During the Procedure

Applying Solution

A chemical peel for acne scars begins with cleaning the skin. The dermatologist then applies a chemical solution to the skin’s surface to treat acne. This chemical peel solution can be light, medium, or deep, depending on the condition of the acne scars.

The chemicals used in peels for acne often include glycolic acid (GA) and trichloroacetic acid (TCA). These acids help remove dead skin cells and promote cell turnover, making them effective in a chemical peel and treating acne. The process, such as a chemical peel for acne, usually takes about 30 minutes in an office setting.

Sensations Felt

Patients may feel various sensations during a chemical peel. A common feeling is tingling or burning as the chemical solution works on the acne-prone skin. Some patients report mild discomfort.

For deeper peels, there might be more intense sensations. The dermatologist may use a fan or cold compresses to reduce these feelings after a chemical peel for acne. It’s crucial to communicate any severe pain immediately to your provider.

Professional Monitoring

Professional application and monitoring are vital during a chemical peel procedure for acne. Dermatologists have the training to apply solutions like chemical peel and acne treatments correctly and safely. They also monitor patient reactions closely throughout the session.

This careful oversight helps minimize risks like uneven texture, acne, or excessive peeling. History of sun exposure, acne, or existing skin conditions should be discussed beforehand to tailor the chemical peel treatment appropriately.

Post-Peel Care

After applying the peel, dermatologists often neutralize it with water or a special solution to treat acne. Patients might notice their skin turning red and feeling tight after this step in the chemical peel for acne.

Proper post-procedure care after a chemical peel includes avoiding sun exposure and using gentle skincare products to prevent acne. Healing time varies based on the type of peel:

  • Light Peels: Recovery in 1-7 days
  • Medium Peels: Recovery in 7-14 days
  • Deep Peels: Recovery in 14-21 days

Post-Procedure Care

Expected Reactions

After a chemical peel, the skin may react in several ways, including acne. Redness is common after a chemical peel and can last for a few days, especially if you have acne. Scaling might occur as the old skin peels away. Some people experience swelling, especially after deeper treatments. These reactions, such as acne, are normal and usually subside within one to two weeks after a chemical peel.

Care Instructions

Proper care is crucial after a chemical peel. Avoid sun exposure as the new skin is very sensitive after a chemical peel or acne treatment. Apply sunscreen with at least SPF 30 daily. Use gentle cleansers and moisturizers to keep the skin hydrated, especially after a chemical peel or if you have acne. Bandages may be recommended for deeper peels to protect the treated area and manage acne.

Resuming Activities

Normal activities can typically be resumed within a few days after a mild peel for acne. For deeper peels, it might take up to two weeks before returning to regular routines, especially for acne. Avoid strenuous exercise during this period as it can increase swelling, especially after a chemical peel or if you have acne.

Subsequent Peels

The timeline for additional treatments varies based on the type of peel used for acne. Mild peels for acne can be repeated every four to six weeks. Deeper peels may require several months between sessions. Consult your dermatologist to determine the best schedule for your acne and chemical peel needs.

Expected Outcomes

Ideal Results

Chemical peels can significantly improve acne scars. The ideal results of a chemical peel include smoother skin texture and reduced acne scar visibility. However, these outcomes vary among individuals.

Effects of Peel Depth

The depth of the peel affects the results. Superficial peels may offer minor improvements. Medium and deep peels provide more noticeable changes but come with longer recovery times, especially for acne.

Skin Type Variability

Different skin types respond differently to chemical peels. Oily or combination skin with acne might heal faster than dry or sensitive skin after a chemical peel. This variability impacts the overall effectiveness of the treatment.

Individual Healing Processes

Each person’s healing process is unique. Some people see improvements within weeks after a chemical peel, while others need months for optimal results with acne. Patience is essential during this period.

Multiple Sessions Needed

Achieving significant improvement often requires multiple sessions. Deep acne scars usually need several treatments, such as a chemical peel, spaced weeks apart. Consistency in following the treatment plan is crucial.

Clinical Trials and Studies

Clinical trials have shown that chemical peels are an effective treatment for acne scars. Studies indicate a high rate of satisfaction among participants who undergo multiple sessions, including chemical peel treatments for acne.

Treatment Efficacy

Treatment efficacy depends on various factors like peel type, concentration, application technique, and acne. Consulting a dermatologist ensures a tailored approach to maximize benefits, including chemical peel treatments for acne.

Potential Breakouts

e individuals may experience acne breakouts after a chemical peel session. This is usually temporary and part of the healing process as old skin sheds and new layers form after a chemical peel or due to acne.

Aesthetic Goals

Setting realistic aesthetic goals helps manage expectations. While chemical peels can greatly improve skin appearance, they may not completely eliminate deep acne scars.

Closing Thoughts

Chemical peels can be a game-changer for tackling acne scars. By understanding the procedure, choosing the right peel, and following proper care, you can achieve smoother, clearer skin and reduce acne. It’s crucial to weigh the benefits against the risks of a chemical peel for acne and prepare adequately to ensure the best results.

Ready to take the next step? Consult with a dermatologist to find the perfect peel for your acne and skin type. Your journey to radiant skin starts now. Don’t wait—embrace the transformation today!

Frequently Asked Questions

What are chemical peels?

Chemical peels use acids to exfoliate the skin. They remove dead cells and promote new cell growth through a chemical peel, improving acne scars.

How do I choose the right peel for acne scars?

Consult a dermatologist. They will assess your skin type, acne, and scar severity to recommend the best peel.

What should I do to prepare for a chemical peel?

Avoid sun exposure and stop using retinoids or exfoliants a week before the chemical peel procedure to treat acne. Follow your dermatologist’s instructions.

Are there benefits to using chemical peels for acne scars?

Yes, a chemical peel can improve skin texture, reduce acne scar visibility, and boost collagen production.

What risks are involved with chemical peels?

Risks include redness, irritation, scarring, or hyperpigmentation. Always consult a professional.

What happens during the chemical peel procedure?

A solution is applied to your skin, causing it to exfoliate and eventually peel off acne. The process takes about 30 minutes.

How should I care for my skin after a chemical peel?

Keep your skin moisturized, avoid sun exposure, and follow any post-care instructions from your dermatologist.

CoolTone Buttocks Before and After: Stunning Transformations

Key Takeaways

  • CoolTone Effectiveness: CoolTone is a non-invasive body shaping treatment that can significantly enhance muscle tone and firmness in the glutes, as evidenced by before and after photos using advanced technology.
  • Visible Results: Patients often see noticeable improvements in muscle definition and firmness within a few weeks, with optimal results in body shaping and fat reduction appearing after multiple sessions and minimal swelling, as shown in images.
  • Longevity of Results: The effects of CoolTone technology can last several months, but maintaining results may require periodic follow-up treatments to achieve your goals.
  • Personalized Treatment Plans: Individual results can vary, so it’s essential to have a personalized consultation to set realistic expectations and develop a tailored treatment plan using technology to address body fat.
  • Maintenance is Key: For lasting results, combine CoolTone treatments with regular exercise and a balanced diet to maintain muscle tone, reduce body fat, and overall fitness.
  • Patient Satisfaction: Testimonials highlight high satisfaction rates, with many patients experiencing improved confidence and body image after their fat treatments.

Understanding CoolTone

Technology Explained

CoolTone uses magnetic muscle stimulation (MMS) technology. It sends electromagnetic energy to muscles. This energy causes muscles to contract. These contractions are more intense than those from regular body exercise.

The device targets specific muscle groups. For buttocks, it focuses on the gluteal muscles. This leads to enhanced muscle tone and strength. The process is simple and quick.

Safety and FDA Approval

CoolTone received FDA approval in June 2019. It is approved for strengthening, toning, and firming muscles in the abdomen, buttocks, and thighs, reducing fat, and improving body contour. The FDA approval ensures that CoolTone meets safety standards.

Patients report minimal side effects. Some may experience mild muscle soreness or redness at the treatment site on the body. These effects usually disappear within a few days.

Non-Invasive Procedure

CoolTone treatments are non-invasive. There are no incisions or needles involved. This makes it a safer alternative to surgical methods like butt lifts or implants.

Non-invasive procedures reduce recovery time. Patients can return to normal activities immediately after treatment. There is no need for anesthesia or pain medication.

Benefits Over Surgery

CoolTone offers several benefits over traditional surgery:

  • No downtime
  • Minimal discomfort
  • Lower risk of complications
  • No scarring

Before and After Gallery

Diverse Photos

This gallery showcases a variety of before and after images. These photos highlight CoolTone’s effectiveness on different body types. Each photo shows clear changes in buttock firmness and shape.

Session Details

Every image includes captions. These captions detail the number of sessions each patient underwent. For example, one patient had four sessions over a month. Another patient saw improvements after just two sessions.

Visual Improvements

The visual improvements are evident. Buttocks appear firmer and more toned post-treatment. The differences are noticeable even after the first session.

Patient Notes

e patients shared their experiences. One noted increased confidence following the treatment. Another mentioned feeling more comfortable in fitted clothing.

Expected Results

Enhanced Muscle Tone

Patients can expect enhanced muscle tone in the buttocks. This is due to the CoolTone treatments. The process uses magnetic muscle stimulation. This stimulation causes involuntary contractions in the muscles. These contractions are more intense than regular exercise.

Firmer Buttocks

A firmer appearance of the buttocks is another outcome. After several sessions, patients notice a lift in their glutes. The treatment targets specific areas to improve firmness. It helps achieve a toned look that many desire.

Number of Treatments

The average number of treatments needed varies. Most patients see visible results after four to six sessions. Each session lasts about 30 minutes. For optimal results, it’s advised to follow the entire process as recommended by the specialist.

Natural Appearance Concerns

e worry about whether the results will look natural. CoolTone aims to enhance your body’s natural form. The muscle tone and firmness achieved blend well with your physique. It’s not an artificial enhancement but a boost to existing muscles.

Common Questions

Many ask if the results are permanent. Maintenance sessions every few months help sustain the benefits. Another common question involves discomfort during treatment. Most report minimal discomfort, comparing it to an intense workout.

Results Timeline

Initial Weeks

During the first few weeks, patients might not notice significant changes. The CoolTone technology stimulates muscle contractions. This process begins to build and tone muscles from the inside.

e people feel a difference in muscle firmness. Visible results usually take longer.

Week Four to Six

Around the fourth week, subtle changes become noticeable. Muscle definition starts to improve. Patients often report feeling stronger.

One patient noted, “By week five, my buttocks felt firmer.” This period is crucial for maintaining consistency with treatments.

Week Seven to Nine

Between weeks seven and nine, more pronounced results appear. Muscles gain better definition. Many patients see visible toning and lifting of the buttocks.

A patient mentioned, “I saw a real change by week eight.” Patience during this time is key for optimal results.

Long-Term Results

Long-term results depend on individual plans and goals. Regular maintenance treatments help sustain muscle tone.

Patients should follow their provider’s recommendations for the best outcomes. Consistency in sessions ensures lasting benefits.

Duration of Effects

Longevity Factors

CoolTone results typically last for several months. However, the longevity depends on various factors. Lifestyle choices play a significant role. Regular exercise and a balanced diet can help maintain muscle tone.

Follow-up treatments are also crucial. Many patients opt for maintenance sessions every few months. This helps in keeping the muscles toned and firm.

Studies and Statistics

Several studies have examined CoolTone’s efficacy over time. According to research, most patients see effects lasting between three to six months. A 2020 study found that regular follow-up treatments extended the results up to a year.

Statistics show that 80% of patients reported satisfaction with their results after six months. This indicates a high level of efficacy.

Maintenance Tips

To prolong CoolTone effects, consider these tips:

  • Engage in regular physical activities like strength training.
  • Follow a balanced diet rich in proteins and vitamins.
  • Schedule maintenance sessions every three to four months.

These steps can help in sustaining the muscle tone achieved from CoolTone treatments.

Side Effects

CoolTone is generally safe but may have some side effects. Commonly reported issues include mild muscle soreness and temporary redness at the treatment site. These symptoms usually resolve within a few days.

In rare cases, patients might experience more severe side effects like muscle spasms or prolonged discomfort. Always consult your healthcare provider if you encounter any unusual symptoms.

Maintenance Tips

Regular Exercise

Regular exercise is crucial for maintaining CoolTone results. Focus on exercises that target the buttocks. Squats, lunges, and leg lifts are effective. These exercises help in body shaping and strengthening muscles.

Incorporate cardio workouts as well. Running or cycling can boost overall fitness. Aim for at least 30 minutes of exercise daily.

Follow-up Treatments

Scheduling follow-up treatments is essential. Experts recommend treatments every 3-6 months. This helps sustain muscle tone and definition.

Consult with your provider to determine the best schedule. Consistency ensures long-lasting results.

Hydration

Hydration plays a vital role in maintaining results. Drink plenty of water daily. Proper hydration supports muscle recovery and energy levels.

Avoid sugary drinks and excessive caffeine. They can dehydrate you and affect muscle performance.

Healthy Diet

A healthy diet complements exercise efforts. Include lean proteins like chicken, fish, and beans in your meals. Proteins aid in muscle repair and growth.

Consume fruits, vegetables, and whole grains for balanced nutrition. Avoid processed foods high in sugar and fat.

Rest Periods

Rest is important for muscle recovery. Ensure you get enough sleep each night. Aim for 7-9 hours to allow muscles to heal.

Take breaks between intense workout sessions. Overworking muscles can lead to injury.

Breath Control

Breath control during exercises enhances effectiveness. Breathe deeply through your nose and exhale through your mouth during workouts.

Proper breathing increases oxygen flow to muscles. It helps improve endurance and performance.

Safety Measures

Adhere to safety measures during workouts to prevent injuries:

  • Warm up before exercising.
  • Use proper form and technique.
  • Listen to your body’s signals.
  • Stop if you feel pain or discomfort.

These steps ensure safe and effective exercise routines.

Vacation Considerations

Plan around vacations wisely to maintain results. Engage in light exercises even while on vacation:

  • Walk instead of using transportation.
  • Perform simple bodyweight exercises.

These activities help keep muscles active without disrupting relaxation time.

Patient Testimonials

Positive Feedback

Patients often share positive feedback about their Coolspa experience. Many highlight the professionalism of the staff and the effectiveness of the treatments. One patient said, “The staff made me feel comfortable from start to finish.” They appreciated how everyone at Coolspa was helpful and friendly.

Another patient mentioned, “I saw noticeable results after just a few sessions.” This statement reflects the high satisfaction level with Coolspa’s services.

Jena’s Professionalism

Jena, one of Coolspa’s providers, receives glowing reviews. A testimonial highlighted her thoroughness and friendliness. The patient shared, “Jena answered all my questions with patience.” They felt reassured by her in-depth knowledge and caring attitude.

This patient also noted, “Her attention to detail was impressive.” Jena’s commitment to providing excellent care stood out during their visit.

Personalized Care Journey

One patient’s journey from initial consultation to post-treatment satisfaction shows the personalized care provided at Coolspa. During their free consultation, they discussed their goals and received a tailored treatment plan.

The patient remarked, “My treatment plan was customized for my needs.” They valued how the provider listened and designed a plan specifically for them.

After starting the sessions, they experienced consistent follow-up. The patient stated, “The follow-up care was exceptional.” Regular check-ins ensured they were progressing well without any issues like swelling or discomfort.

Summary

CoolTone can give your buttocks a firmer, more sculpted look. The before and after gallery shows real results that you can expect. With proper maintenance, the effects last longer, making it a worthwhile investment. Patient testimonials highlight the satisfaction and confidence boost experienced by others.

Ready to transform your look? Book your CoolTone session today and embrace the new you. Don’t wait; start your journey to a better body now!

Frequently Asked Questions

What is CoolTone?

CoolTone is a non-invasive body contouring treatment. It uses magnetic muscle stimulation (MMS) to tone, firm, and strengthen muscles.

How soon can I see results from CoolTone?

Results can be seen as early as 2-4 weeks after treatment. Optimal results are typically observed after a series of treatments.

Are CoolTone results permanent?

No, CoolTone results are not permanent. Maintenance treatments are recommended to sustain muscle tone and strength.

How long does a CoolTone session last?

A typical CoolTone session lasts about 30 minutes. The duration may vary depending on the treatment area.

Is there any downtime after a CoolTone treatment?

There is no downtime with CoolTone. Patients can return to their normal activities immediately after the procedure.

What areas can be treated with CoolTone?

CoolTone is FDA-cleared to treat the abdomen, buttocks, and thighs. It helps enhance muscle definition in these areas.

Are there any side effects of CoolTone?

Side effects are minimal and may include temporary muscle soreness or redness at the treatment site. These usually resolve quickly.

Mole Removal Methods: Surgical, Laser, and More Explained

Key Takeaways

  • Consult a Dermatologist: Always consult a dermatologist to evaluate the appearance of your mole, address any questions, and recommend the best removal method without relying on home remedies.
  • Know Your Options: Understand the different mole removal methods, such as excision, laser, cryotherapy, home remedies, and their pros and cons; consider the types, questions, and appearance.
  • Prepare Adequately: Follow pre-appointment instructions carefully, including any home remedies like honey, to ensure a smooth procedure.
  • Understand the Procedure: Be aware of what happens before, during, and after the mole removal, including home remedies, to manage expectations and reduce anxiety.
  • Follow Aftercare Instructions: Adhere strictly to aftercare guidelines and home remedies to promote healing and prevent infection.
  • Consider Alternatives: Explore alternative and safer options if traditional mole removal methods are not suitable for you.

Understanding Mole Removal

What is a Mole?

A mole is a small, dark spot on the skin. It can be flat or raised. Moles are usually brown or black. They form when skin cells grow in a cluster instead of spreading out.

Benign moles are harmless. They do not change in size, shape, or color. Potentially cancerous moles can look different. They might grow larger, change colors, or have irregular borders.

Reasons for Removal

e moles need to be removed due to cosmetic reasons. People may find them unattractive or bothersome. Moles on the face or neck are common concerns.

Risk of skin cancer is another reason for mole removal. Melanoma, a dangerous type of skin cancer, can develop from moles. Early detection and removal can prevent serious health issues.

Doctors recommend removing moles that:

  • Change in size
  • Change in color
  • Have irregular edges
  • Cause itching or bleeding

Mole Removal Process

Mole removal is a quick outpatient procedure. It typically takes less than an hour.

First, the doctor examines the mole using tools like a dermatoscope. This helps determine if the mole looks suspicious.

Local anesthesia numbs the area around the mole. The patient feels no pain during the procedure.

There are different methods for removing moles:

  1. Excision with stitches: The doctor cuts out the entire mole and some surrounding tissue.
  2. Shave excision: The doctor shaves off the mole with a blade.
  3. Laser removal: A laser light removes small, non-cancerous moles.
  4. Cryotherapy: Liquid nitrogen freezes and destroys the mole.

After removal, doctors send suspicious moles to a lab for testing.

Types of Mole Removal Methods

Surgical Excision

Surgical excision is a common mole removal method. It involves cutting out the mole along with a margin of healthy skin. This technique ensures that all mole cells are removed. A local anesthetic numbs the area before the procedure.

The surgeon uses a scalpel to cut around and under the mole. The wound is then stitched closed. Surgical excision is effective for both benign and malignant moles. However, it can leave a scar, which varies in size based on the mole’s size and depth.

Shave Excision

Shave excision is less invasive than surgical excision. It is suitable for non-cancerous moles that protrude above the skin surface. In this method, the doctor uses a small blade to shave off the mole at skin level.

Local anesthesia is applied to numb the area. No stitches are needed, and healing time is usually shorter compared to surgical excision. Shave excision may not be ideal for deeper moles as it does not remove tissue beneath the skin’s surface.

Laser Removal

Laser removal uses concentrated light beams to break down mole cells. This method works best for flat, non-cancerous moles. Multiple sessions might be necessary depending on the mole’s size and depth.

A topical anesthetic cream often numbs the area before treatment begins. Laser removal minimizes scarring since there are no cuts or stitches involved. However, it may not be suitable for larger or deeper moles.

Choosing a Method

Choosing between these methods depends on several factors:

  • Scarring: Surgical excision tends to leave more noticeable scars compared to shave excision or laser removal.
  • Effectiveness: Surgical methods are more effective for removing deeper or potentially malignant moles.
  • Suitability: Less invasive methods like shave excision and laser removal are better for superficial, non-cancerous moles.

Each method has its pros and cons:

  • Surgical Excision Pros: Highly effective; removes entire mole.
  • Surgical Excision Cons: Higher risk of scarring; longer recovery time.
  • Shave Excision Pros: Quick recovery; minimal scarring.
  • Shave Excision Cons: May not remove deep tissue; less effective for large moles.
  • Laser Removal Pros: Minimal scarring; non-invasive.
  • Laser Removal Cons: Requires multiple sessions; less effective for deep or large moles.

Preparing for Your Appointment

Make a List

Create a list of all moles that have changed in appearance. Note if they have grown, changed color, or become painful. People often overlook small changes, but these can be important. Include any moles that cause pain or itchiness. This will help your healthcare professional assess each one properly.

Compile Medical History

Gather your medical history before the appointment. Include details about any previous mole removals and family history of skin cancer. Knowing your family’s health background can provide important context for the doctor. If you had moles removed before, note the dates and reasons.

Prepare Questions

Write down any questions you have about the mole removal process. Ask about different methods and what to expect during recovery. Knowing more can help reduce anxiety and make you feel prepared.

Wear Appropriate Clothing

Choose clothing that allows easy access to the areas with moles. Loose-fitting clothes are often best. Avoid wearing makeup or opaque nail polish if moles are on your face or nails. These products can obscure the look of the mole, making it harder for the doctor to examine them properly.

Emotional Preparation

Mole removal can be stressful for some people. Talk to someone you trust about your concerns. Knowing you’re not alone can help ease worries.

What to Expect Before the Procedure

Initial Consultation

The initial consultation is crucial. The dermatologist will examine the mole. They will decide on the best removal method based on its size, shape, and color.

etimes, they may use a dermatoscope. This tool helps them see more details of the mole’s surface. Accurate assessment ensures the right treatment.

Possible Biopsy

If the mole looks suspicious, a biopsy might be necessary. The dermatologist will remove a small part of the mole for testing.

Biopsies help detect cancerous cells early. Early detection can lead to better treatment outcomes.

Discussing Allergies and Sensitivities

It’s important to discuss any allergies or sensitivities with your doctor. Local anesthesia is commonly used during mole removal procedures.

e patients may have allergic reactions to anesthesia. Informing your doctor helps them choose a safe option.

Preparation Instructions

Patients should follow specific instructions before the procedure. These may include avoiding certain medications or skincare products.

Proper preparation reduces risks and ensures smoother recovery.

During the Procedure

Local Anesthesia

Local anesthesia will be applied to numb the area around the mole. This ensures a pain-free experience. You might feel a slight pinch when the anesthesia is injected.

Surgical Excision

In surgical excision, the doctor cuts out the entire mole and some surrounding skin. This method is often used for larger moles or those suspected of being cancerous. The incision is then closed with stitches. Bleeding may occur, but it is usually minimal and controlled during the procedure.

Shave Excision

Shave excision involves using a small blade to remove the mole above the skin level. This method is suitable for moles that are raised but not deeply rooted in the skin. No stitches are needed for this technique. The area may bleed slightly, but pressure and a bandage can control it.

Laser Removal

Laser removal uses concentrated light beams to break down mole cells. This method is ideal for smaller moles or those in hard-to-reach areas of the body. It causes minimal bleeding and does not require stitches. The laser targets only the mole, leaving surrounding tissue unharmed.

Time and Duration

The procedure typically takes less than an hour to complete. The exact time depends on factors such as:

  • Size of the mole
  • Location on your body
  • Method chosen for removal

For example, removing a small mole on your arm might take only 15 minutes, while a larger one on your face could take closer to an hour.

Post-Procedure Care

After removing the mole, doctors will provide specific instructions for care:

  1. Keep the area clean and dry.
  2. Apply any prescribed ointments.
  3. Change bandages as directed.

Stitches, if used, are usually removed within 7-14 days depending on their location and how quickly you heal.

Aftercare and Recovery

Wound Care

Proper wound care is crucial after mole removal. Clean the area with mild soap and water. Use a soft cloth to avoid irritation. Pat the area dry gently. Apply an antibiotic ointment as directed by your doctor.

Cover the wound with a sterile bandage. Change the bandage daily or whenever it becomes wet or dirty. This reduces infection risk.

Signs of Infection

Watch for signs of infection in the days following the procedure. Redness, swelling, and warmth around the wound can indicate infection. Pus or foul-smelling discharge is also concerning.

If you experience fever or chills, seek medical advice immediately. These symptoms can signal a serious infection that needs prompt treatment.

Healing Time

Healing time varies depending on the mole’s size and location. Small moles typically heal within one to two weeks. Larger moles may take three to four weeks.

Expect some redness and tenderness during healing. Scabs will form over the wound before falling off naturally.

Scarring Expectations

Scarring is common after mole removal. The extent depends on factors like mole size, location, and your skin type. Initially, scars may appear red or pink.

Over time, scars usually fade to a lighter color matching your skin tone. Using sunscreen on healed wounds can help minimize scar visibility.

Skin Color Changes

Skin color changes are normal post-procedure. The treated area might look darker or lighter than surrounding skin initially.

These changes often even out over several months. If discoloration persists, consult your dermatologist for advice on treatments available.

Ensuring Successful Recovery

Follow Instructions

Following aftercare instructions is crucial. It helps prevent infection. Healthcare professionals provide specific guidelines.

Clean the area as directed. Use prescribed ointments or creams. Avoid touching or scratching the site.

Avoid Sun Exposure

Protecting the healing skin is vital. Avoid direct sun exposure. Ultraviolet rays can cause pigmentary changes.

Use sunscreen with high SPF. Wear protective clothing and hats when outdoors.

Monitor Healing

Scheduling follow-up appointments is essential. It ensures proper healing and checks for recurrence of the mole.

Doctors will examine the site. They may perform additional treatments if necessary.

Alternative and Safer Options

Home Remedies

Home remedies can be a safer option for mole removal. Applying honey is one such remedy. Honey has antibacterial properties. It may help reduce the size of the mole over time.

Another home remedy involves using garlic. Garlic contains enzymes that can break down cell clusters. This might help in reducing moles.

Topical Treatments

Topical treatments are another non-surgical option. These treatments usually involve creams or ointments. They can be applied directly to the mole.

e topical treatments contain salicylic acid. Salicylic acid helps exfoliate the skin, which can gradually remove benign moles.

Regular Skin Checks

Regular skin checks are vital for monitoring moles. Self-examination should be done monthly. Look for any changes in size, shape, or color.

Use a mirror to check hard-to-see areas. If you notice any changes, consult a dermatologist immediately.

Preventative Measures

Preventative measures can reduce the risk of developing new moles. Using sunscreen with SPF 30 or higher is essential. Sunscreen protects your skin from harmful UV rays.

Wearing protective clothing also helps. Long sleeves, hats, and sunglasses provide extra protection against sun exposure.

Summary

You’ve now got the lowdown on mole removal, from understanding the basics to ensuring a smooth recovery. Each step is crucial for your health and peace of mind. Whether you’re prepping for your appointment or exploring safer options, this guide has you covered.

Ready to take action? Consult a dermatologist to discuss your options and get personalized advice. Your skin deserves expert care. Don’t wait—take control of your skin health today!

Frequently Asked Questions

What are the common methods for mole removal?

Common methods include surgical excision, laser removal, and cryotherapy. Each method has its benefits and is chosen based on the mole’s size, location, and type.

How should I prepare for a mole removal appointment?

Avoid sun exposure and inform your doctor of any medications you take. Clean the area around the mole thoroughly before your appointment.

Is mole removal painful?

Most procedures are minimally painful. Local anesthesia is usually applied to numb the area, ensuring a comfortable experience.

What can I expect during the procedure?

The doctor will clean the area, apply anesthesia, and remove the mole using the selected method. The process typically takes less than an hour.

How long does recovery take after mole removal?

Recovery time varies but generally ranges from a few days to two weeks. Follow aftercare instructions to ensure proper healing.

Are there any risks associated with mole removal?

Risks are minimal but can include infection, scarring, or changes in skin texture. Choosing an experienced professional minimizes these risks.

Are there alternative options to traditional mole removal methods?

Yes, natural remedies like apple cider vinegar or garlic exist but lack scientific backing. Consult a dermatologist for safer options.

Thigh Lift: Preparation, Surgery Steps & Scar Visibility

Preparing for Your Procedure

Initial Consultation

Discuss goals and expectations during the initial consultation. The surgeon will evaluate your upper thigh area. You will talk about potential side effects. It’s important to ask questions and understand the procedure.

Pre-Operative Instructions

Follow your surgeon’s pre-operative instructions closely. This may include stopping certain medications. Smoking cessation is often required weeks before surgery. These steps help ensure a safe procedure.

Examination of Thigh Skin

The plastic surgeon will conduct a thorough examination of your thigh skin during the initial consultation. This helps tailor the procedure to your needs. They will check the entire thigh and may focus on the upper leg, groin area, knees, waist, hip, or other specific parts.

Understanding the Surgical Process

Surgical Setting

Thigh lifts take place in hospitals or accredited surgical facilities for patients undergoing cosmetic surgery on their upper leg thighs. These locations ensure safety and hygiene. Accredited facilities meet strict standards. They have emergency equipment ready.

Anesthesia Process

Anesthesia is crucial for a thigh lift. General anesthesia puts patients to sleep. This avoids pain during the procedure. The anesthesiologist monitors vital signs throughout.

Incision Marking

Surgeons mark incision lines before surgery starts. This ensures precision. The marks guide where to cut and remove excess skin during cosmetic surgery to minimize scar and improve the waist.

Making Incisions

The surgeon makes incisions along the marked lines. These cuts allow access to underlying tissues, fat deposits, excess skin, and pockets in the thighs and groin area. Incisions vary based on individual needs.

Fat Removal

Surgeons may remove fat through liposuction techniques. This step reduces bulk in the thighs. It helps achieve a smoother contour.

Skin Tightening

After removing fat, surgeons tighten the remaining skin. They pull it over the newly contoured area. Excess skin gets trimmed away.

Tissue Repositioning

Tissue repositioning is key in thigh lifts. Surgeons adjust muscles, tissues, and excess skin for better shape and support during a thigh lift to improve the waist and minimize scar visibility. This step enhances overall results.

Scars and Their Visibility

Different Types

Thigh lifts come in different types. Each type has unique scar locations. The medial thigh lift targets the inner thighs. It leaves scars along the groin crease. The vertical thigh lift addresses more severe sagging. Its scars run down the inner thighs to the knees, past the waist and excess skin.

Scar Location

Scars from a thigh lift vary by technique. Medial thigh lifts have scars hidden in the groin area to remove excess skin and fat from the thighs. Vertical thigh lifts have more visible scars on the inner thighs, making them suitable for removing excess fat and skin in an ideal candidate. These scars on the thighs can be long, depending on how much skin and fat is removed.

Realistic Expectations

People should set realistic expectations for scar visibility on the skin post-surgery, especially in the thigh area after a thigh lift. Scars will be permanent, but they fade over time. Initially, they may appear red or raised. Over months, they usually become less noticeable.

Long-Term Appearance

The long-term appearance of scars on the skin depends on several factors, including fat in the thigh area.

  • Skin type
  • Healing process
  • Post-surgery care

e people may develop thicker scars called keloids.

Minimization Techniques

Discuss scar minimization techniques with your surgeon:

  • Use silicone sheets or gels
  • Apply sunscreen to protect healing skin
  • Massage the scar area gently

These methods can help improve the final look of your scars on the skin after a thigh lift.

Post-Surgery Recovery and Care

Immediate Care

Patients may need immediate care after a thigh lift. Some might stay in the hospital overnight. Others might go home the same day. It depends on their condition, the plastic surgeon’s advice, and whether a thigh lift is needed for the skin and fat on their thighs.

Home Instructions

Rest is crucial for recovery. Follow the plastic surgeon’s instructions for home care. Keep the surgical site clean to avoid infection. Avoid strenuous activities to prevent complications.

Pain Management

Expect some pain after surgery. The surgeon will prescribe medication to manage it. Report any severe pain or unusual side effects immediately.

Follow-Up Appointments

Regular follow-up appointments are essential. They help monitor recovery and address concerns. The surgeon will check for proper healing and any signs of complications, including the skin on the thighs for excess fat.

Patient Community Support

Engage with the patient community for support. Many patients share their experiences online. This can provide emotional support and practical tips.

Closing Thoughts

You’ve got the lowdown on preparing for your thigh lift, understanding the surgery, dealing with scars, navigating recovery, and addressing excess skin and fat on your thighs. This journey demands commitment and careful planning. But the payoff? A new level of confidence and comfort in your own skin, free from excess fat with a thigh lift.

Ready to take the plunge? Consult with a certified surgeon to discuss your options. Your future self will thank you for investing in this transformative thigh lift procedure. Don’t wait—start your path to a rejuvenated you today!

Frequently Asked Questions

What should I do to prepare for a thigh lift?

Stop smoking and avoid certain medications. Follow your surgeon’s preoperative instructions closely.

How is the thigh lift surgery performed?

The surgeon makes incisions, removes excess skin and fat, and tightens the remaining tissue during a thigh lift.

Will I have visible scars after a thigh lift?

Yes, but they will fade over time. Surgeons aim to place them in less noticeable areas.

How long does recovery take after a thigh lift?

Recovery typically takes 4-6 weeks. Follow your surgeon’s advice for best results.

What can I expect during post-surgery care?

Rest, avoid strenuous activities, and keep the surgical area clean after your thigh lift to maintain healthy skin and reduce fat. Attend all follow-up appointments.

Are there risks associated with a thigh lift?

Yes, like any surgery, it includes risks such as infection or scarring, especially in procedures like a thigh lift involving skin and fat. Discuss these with your surgeon.

How can I minimize complications after my thigh lift?

Follow all post-operative care instructions carefully. Stay hydrated and maintain a healthy diet.